Showing posts with label Dairy. Show all posts

Monday, August 22, 2011

Dan in the Kitchen -- Grilled Cream Cheese and Colby Jack Sandwich


So, I'd like to introduce a new series of posts called "Dan in the Kitchen," where I document Dan's forays into the kitchen. I figure since I'm not always in the mood to cook, but we still need to eat, everyone would benefit from Dan gaining some cooking skills. Until we moved in together, pretty much all Dan ate was buffalo chicken subs from the student center deli, Cheez-its and pasta with bottled spaghetti sauce. To this day, if I'm not around for dinner, or if I don't feel like cooking, he'll just have a few beers and a pack of Oreos. So unappetizing, not to mention super unhealthy. I have high hopes that this "Dan in the Kitchen" thing is really going to turn things around for his eating habits. At the very least, this will add some variety to his diet. And, it's going to be fun to teach Dan how to cook!


I'm convinced that Dan could actually be a great cook if he put his mind to it. He's an engineer, so he deals with long, complicated instructions and handles delicate circuitry for a living -- surely he could follow a recipe with equal skill and finesse! I mean, constructing a meal is not so different than building a satellite, right?


The first recipe from Dan in the Kitchen is the humble grilled cheese sandwich, jazzed up with cream cheese and colby jack. OK, so maybe this isn't "healthy" per se, but we have to start somewhere, and this is a straightforward, frills-free recipe that's super delicious and satisfying. Just butter some bread, throw on some cheese, and cook it all on a hot pan. The cream cheese was my idea -- Dan was deeply skeptical, but he was nice enough to let me bully him into using it. 


The cream cheese turned out to be a fantastic idea. It added a whole new level of goeey, tangy, cheesiness to the sandwich that provided a wonderful contrast to the crunchy, buttery bread. The bread was perhaps a little too crunchy, but Dan has always liked his breads a little more toasted than I do. Either way, delicious! Not a bad start for Dan in the Kitchen.

Grilled Cream Cheese and Colby Jack Sandwich

Ingredients:
- 2 slices bread, buttered on both sides
- 1 slab cream cheese
- 1 slice of colby jack cheese

Steps:
(1) Heat a pan on medium heat. When the pan is hot, slap on both pieces of bread.
(2) Toast one side of the bread to golden brown, then flip over and layer with cheese -- cream cheese on one slice, colby jack on the other.
(3) Cook for about 30 seconds, until cheese is slightly melted, then place one piece of bread on top of the other (cheese to cheese) and press down until the two cheeses are molded together.
(4) When the bread is toasted to your satisfaction, and the cheese is perfectly melty and gooey, take your sandwich off the heat and slide it onto a plate.
** If you find (as we did) that your colby jack doesn't melt as nicely as you hoped, stick your sandwich in the oven and broil on low heat for about 3-4 minutes.
(5) Cut in half and enjoy hot with a cold soda and some chips.

Thursday, August 4, 2011

Cheesy Creamy Shrimp Spaghetti


So, it's been a while since my last post, huh? Yeah. Things have been a little hectic around here. So, unsurprisingly, Dan and I have been doing a whole lot of Chinese delivery-ing, and very little cooking. I made fried chicken last weekend for my friend Alex's birthday in NY, but...all the pictures are on his camera, and he has yet to send them to me. (Get on it, Hsu!) 


In other news, did you know that it's Mob Week this week? I know everyone is super excited about the shark action going on at the Discovery Channel, but who wants to see sharks attacking a fish decoy when there are classic mobster movies on TV? And, guess what else premieres this week? The Jersey Shore, Season 4: Italy! The most famous guidos on the planet take over Florence! Coincidence? I think not. 


With all the Italian madness on TV, I'm really craving a big bowl of pasta. Something creamy, in fact. Thankfully, I have about five pounds of dried spaghetti in the pantry from our last BJs run, as well as a tub of Savory Garlic Philadelphia Cooking Creme that comes with a Creamy Shrimp and Rice recipe that's easily converted into a pasta dish. A little chopping, a little stirring, and thirty minutes later, Dan and I are happily slurping piping hot bowls of cheesy creamy shrimp spaghetti while we finish watching Scarface. Not exactly the kind of meal you'd expect to have on a warm summer night, but very delicious, and very satisfying.

Cheesy Creamy Shrimp Spaghetti (Adapted from the Philadelphia Cooking Creme recipe)

Ingredients:
- 1/2 box spaghetti
- 1/2 a red onion, diced
- 1/2 a red bell pepper, diced
- 1 lb shrimp, peeled and de-veined
- 1/4 cup milk (I didn't have milk, so I used heavy cream. Very tasty!)
- 1 container Savory Garlic Philadelphia Cooking Creme

Steps:
(1) Boil and drain spaghetti noodles, then set aside.
(2) In a large pot/skillet, heat olive oil on medium-high and add onions + peppers. Cook for about 4-5 minutes, until soft.
(3) Add cream and shrimp. Cook until the shrimp are pink and curled in on themselves.
(4) Mix in cooking cream. Cook until sauce is hot and melty.
(5) Add cooked pasta to the skillet. Toss until each noodle is well-coated with sauce.
(6) Serve hot, garnished with some green onions.

Monday, July 11, 2011

Crab Rangoons


So last week I made crab rangoons for the first time. We were in Boston for 4th of July weekend, and one of our friends invited us over to make sushi. This, of course, meant crab rangoons were on the menu too. And crab cakes. And peach margaritas. I dunno, it made sense at the time.


Anyway, turns out rangoons are really easy to make. Just mix up some cream cheese, chopped green onions, and shredded synthetic crab meat...


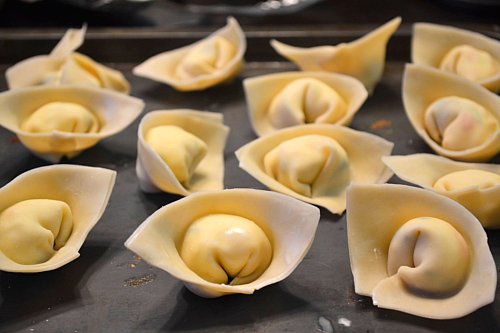
Scoop fat spoonfuls of filling into the center of some wonton skins...


And fold those suckers into adorable little wonton shapes. Triangular rangoons are easier to make, but I love that these look like little ladies in bonnets.


We originally made these to be an appetizer to our pre-planned dumpling dinner, but they were so good we just ate them for dinner instead. Great decision. They were wonderfully crispy and savory, with hot, creamy/gooey centers. Yum.

Crab Rangoons

Ingredients:
- 8 oz cream cheese, room temperature
- 1 cup synthetic crab meat, chopped or shredded
- 1/2 cup green onion, chopped
- 1-1/2 packets of wonton skins
- 1/2 cup water for sealing

Steps:
(1) Fill your fryer with oil and heat to 350 degrees.
(2) In a large bowl, mix together cream cheese, crab meat, and green onions until well-combined.
(3) Spoon about a teaspoon of filling into the center of a wonton skin, wet the edges of the skin with water, and fold it in half so that you get a rectangle with a lump in the center. Then, take the bottom two edges of the rectangle, where the skin is folded, and pull them gently together. The edges of the skin should fold inward, and you'll get something that looks like a lady wearing a bonnet. (You can also just fold the wrapper corner to corner so that you have a triangle rangoon. Either way, make sure edges are tightly sealed.)
(4) Repeat however many times you need until all the filling is used up. (I made around 3 dozen rangoons.)
(5) Fry rangoons until they are dark gold in color -- about 4.5 minutes.
(6) Enjoy while hot...but be careful not to burn your tongue on molten cream cheese!

Sunday, May 8, 2011

Baked Taquitos al Pastor


There is so much al pastor in my fridge right now, I almost don't know what to do with it. Almost. I'm toying with the idea of combining it in some form with kimchi, but I haven't quite decided which direction to go with that yet. For now, I'll have to settle for taquitos. Why baked? Because I just spent the weekend gorging on steak and lobster and brownies, and I'm feeling a little guilty. Nothing about this recipe is healthy, per se, but surely baked is less sinful than deep-fried?

Recipe can be found here, courtesy of the Pink Parsley blog

Sunday, May 1, 2011

Bananas Foster Trifle


I wanted to make trifles out of my strawberry rum pound cake a couple weeks ago, but my stemless wineglasses proved to be less than satisfactory vessels for putting it all together. Nothing layered properly, and my fingers kept smearing stuff. So, I ordered a set of mini trifle bowls, and they arrived a few days ago.

What is trifle, exactly? It's basically a cake-based parfait, with layers of cake (usually pound or sponge), custard, fruit, gelatin, and whipped cream. Yum, right? I didn't have pound cake or sponge cake lying around, but since there was still some banana bread left over, I decided to make a Bananas Foster trifle.


I originally wanted to make the characteristic Bananas Foster rum sauce for my trifle, but that was a total botch. While it was cooking, I took my eye off the skillet and the sugar burned. The sauce, which had been smelling pretty good up to then, turned black, started smoking, and was basically totally ruined. Ugh. So, I scrapped the sauce and made do with banana bread, cooked bananas, and whipped cream. And you know what? Totally delicious. Banana lovers everywhere would go nuts for this sweet and creamy, intensely banana-y treat. Dan, who had already eaten pizza, chips and salsa, and cheesy bread, and insisted that he was too stuffed to eat more than a few bites of trifle, ate the whole bowl. Mini-bowl, but still.

Bananas Foster Trifle

Ingredients: (Makes 2 mini-trifles)
- 4 pieces banana bread, chopped into squares.
- 1/4 cup brown sugar
- 1/2 stick butter
- 1 dash cinnamon
- 1 dash cloves
- 1 banana, cut in half length-wise
- 1 cup heavy cream, whipped and sweetened.

Steps:
(1) Layer the bottom of each mini-trifle bowl with some of the chopped banana bread, in one even layer. Set aside.
(2) In a skillet, cook butter and brown sugar until simmering. Add spices.
(3) Place both halves of the banana into the skillet and spoon sauce over the top. Cook until a sugary crust forms on the outside of the fruit. Pull out and set aside.
** At this point you can keep cooking the sauce until it is thick and syrupy, then add it as one of your trifle components. Mine burned, so I left it out...
(4) Let bananas cool, then chop them into small pieces.
(5) Layer chopped bananas on top of the banana bread in the trifle bowls.
(6) Layer the remaining banana bread on top of the cooked bananas.
(7) Top with whipped cream. Sprinkle with cinnamon and serve.

One year ago: Chocolate Fudge

Friday, March 11, 2011

New Orleans-Style Bread Pudding With Whiskey Sauce


Happy belated Mardi Gras, everyone! I was planning to make New Orleans-themed foods for Fat Tuesday  this year -- gumbo, jambalaya, king cake, beignets, etc. -- but work this week has been all kinds of hectic, and I was too tired to cook anything but leftovers in the microwave. Now that Mardi Gras is over, and St. Patty's Day is around the corner, I was sort of thinking that this recipe could kind of represent both occasions, since bread pudding and whiskey are traditional Irish foods, and Emeril Lagasse tells me this pudding is "New Orleans-style," whatever that means. 


Bread pudding is one of those wonderful, mysterious foods that  I didn't discover until fairly recently. I'd seen it on menus and in display cases at various cafes, but nothing about the name or appearance enticed me to try it. Then Karen and I decided to have dinner at the Circle Bistro before our annual date to see the Nutcracker, and chocolate bread pudding was the dessert offering for the prix fixe meal we both ordered. One bite, and I was in love. The pudding was dense and rich and succulent, like an extra moist chocolate cake. From that day on, I was sold on bread pudding because I figured if chocolate bread pudding tasted this good, how bad could the other variations be?


Bread pudding really doesn't look very appetizing when it's being made, does it? After all, it's just soggy bread sitting in a pool of cream. But it smells fantastic, even before going in the oven. Sweet and cinnamon-y, with the heady scent of French bread. And after it's baked? Then drizzled with boozy cream sauce? We've got the makings of a nose-gasm, folks.


I didn't use as much brown sugar in the pudding as the recipe called for, and I wish I had. The bread pudding is good, but it would be even better if were just a little sweeter. Dan thought it tasted fine and polished off two bowlfuls, but I've got more of a sweet tooth than he does, and I'm the one doing the baking so next time...more sugar! 

Recipe can be found here, courtesy of Emeril Lagasse and the Food Network.

Monday, February 21, 2011

Tiramisu


So last week one of my interns told me that if I could successfully make tiramisu and post about it, his wife would officially start following/reading my blog. Well! I'm never one to turn down new readership, so....challenge accepted.


If I had known how difficult it would be to track down all the ingredients for tiramisu, I probably wouldn't have been quite so enthusiastic about accepting the challenge. I had to hit up to two different Safeways before I managed to get my hands on marscapone cheese, and then neither store had ladyfingers. In fact, none of the store employees had even heard of ladyfingers. "Lady Bingers?" one guy repeated in confusion. "No. Lady FINGERS. They're cookies that look like fingers? No? Nevermind." In the end, I had to just make my own. Oy.


So...espresso is basically just really strong coffee, right? I didn't have a fancy espresso maker, but I did have an electric drip coffee brewer. I also had a giant tub of Folgers coffee grounds from BJs, but I didn't think that would taste very good in a dessert, so I bought some espresso grounds and hoped that would make a difference. The espresso certainly smelled significantly better than the Folgers. And then when a splash of rum got thrown in the mix...yum! No wonder everyone likes tiramisu.


Aside from the grocery store debacle, tiramisu-making proceeded smoothly for the most part until the very end. Then, as I began building the cake layers, I realized that (1) I had made too few ladyfingers, so the tiramisu was going to be significantly more cream than cookie; and (2) the baking dish I was using was too long and shallow, so the whole thing was going to be a lot flatter than those gloriously thick cakes you get at Italian restaurants. Bummer! Still, it was too late at that point to change anything, so I just barreled onwards and hoped that even if my tiramisu didn't look great, it would at least taste good.


And it did! Shockingly good, in fact. 12 hours in the fridge had firmed the cream up to the perfect consistency, and while there was very little sugar in both the ladyfingers and marscapone cream, the whole concoction was pleasantly sweet, with distinct notes of coffee and rum. Mmm, rum. My tiramisu was definitely rummier than the usual restaurant version, but the stronger boozy flavor was not at all off-putting. Delicious! Are you reading yet, Heather? :)

Recipe can be found here, courtesy of the Barefoot Contessa.

Thursday, February 17, 2011

Apple Cheesecake Cupcakes


Last night I was seized with the most irresistible urge to bake something. But what to bake? Nothing chocolate. I'm sick of chocolate, if you can believe it. Maybe a pie? Nah, too much work -- no pre-made pie crusts in the freezer, and I'll be damned if I'm going to start rolling out my own crust at 9pm on a Wednesday. Then I remembered that Dan had been talking earlier in the day about his love of apple turnovers and sugary apple filling. Apple cheesecake cupcakes are topped with something similar to apple pie filling...


The first time I made this recipe was 2 or 3 years ago, the summer of my 1L year. I was working at the FDA in Rockville, MD, but living in DC. My friend Karen, who was also working there, lived down the street from me, and we took the Metro to work together every morning. After several failed attempts to get her to go running with me after work (Dan was living with me that summer, but he is lazy), I devised a plan to change her mind. I whipped up a batch of these cupcakes, then casually started to bring her one every morning "for breakfast." Karen has IBS, so she is generally a light eater, but she has a weakness for cheesecake. After a few days of eating cheesecake for breakfast, she started feeling guilty about indulging her sweet tooth -- but, these cupcakes were too good to resist!  It was easy to bully her into working out with me after that. Love you, Karen!


When I made these cupcakes the Summer of Karen's Downfall, I used peach/mango topping, but any kind of fruit would work just as well. This was my first time using apples, but I think I like them the best. If an apple pie and a cheesecake were to fall in love, mate, and produce a baby, these cupcakes would be it. Dense and creamy, not too sweet, with a hint of tang from sour cream, and topped off with sweet apple pie filling. Yum!

Apple Cheesecake Cupcakes

Ingredients:
(Cheesecake)
- 1-1/2 8oz packages of cream cheese
- 2 eggs
- 2/3 cups sugar
- 1 tbsp vanilla
- 1 tbsp cinnamon

(Sour cream topping)
- 1 cup sour cream
- 2 tsp vanilla
- 3 tbsp sugar

(Apple topping)
- 1 large apple, peeled/cored/diced
- 4 tbsp brown sugar
- 1 tbsp white sugar
- 1 tbsp cinnamon
- 2 tbsp lemon juice
- 1 tbsp corn starch

Steps:
(1) Preheat oven to 300. Line muffin tin with cupcake liners. Set aside.
(2) In a large bowl, mix cream cheese and sugar until smooth and creamy.
(3) Add eggs, vanilla and cinnamon. Mix well.
(4) Spoon cheesecake mixture into cupcake liners, each about 2/3 full.
(5) Bake for 40 minutes. Pull out of the oven and set aside to cool. Leave oven on, and do not remove cupcakes from the tin.
**Cupcakes will come out puffy, but the middle will sink in drastically -- this is good!
(6) In a small bowl, combine sour cream, sugar, and vanilla. Mix well.
(7) When cupcakes have cooled, spoon about a tablespoon of the sour cream topping into the sunken middles of each cupcake.
**Use more if necessary -- I like to see a heaping mound peeking over the edges of the cupcake.
(8) Stick cupcakes back in the oven for 5 more minutes.
(9) While you're waiting for the cupcakes to cool again, start the apple topping. Place apples in a small pot or saucepan, and cook on high heat.
(10) Add sugars and stir. The apples should start getting juicy right away.
(11) Add lemon juice and cinnamon. Keep stirring.
(12) When the apple pieces start to look soft, throw in the corn starch. This will thicken up the juices and leave you with something similar to preserves.
(13) Let the apple mixture cool before spooning on top of cupcakes.
(14) Cupcakes are good warm, but even better after some time in the fridge/freezer.

Sunday, February 6, 2011

Wonton Cups with Spinach and Mushroom Ricotta Filling


Happy Superbowl Sunday, everyone! And...happy 1 year anniversary to my blog! To celebrate both momentous occasions, I spent the better part of the afternoon cooking: crab quesidillas, pizza dip, fresh guacamole, and...wonton cups with spinach and mushroom filling.

Why wonton cups? Well, I got really into cooking-themed books last year, and these cups were mentioned in passing in one of my books. There, the cups were filled with tuna tartare, but I had a feeling the people coming to my Superbowl party weren't going to be thrilled with raw fish, so I went with something a little tamer.


Who knew wonton wrappers were so versatile? I'd only ever used them to make wontons and crab rangoons, but they're actually quite effective as Tostito-esque scoops. And aren't they pretty? This is definitely something that looks fancier and more complicated than it actually is.

You can fill the cups with just about anything -- hummus, crab dip, salsa -- but I can tell you that sauteed spinach/mushrooms with ricotta was very tasty. The only downside is that, once filled, the cups lose a lot of their crisp/crunch over time. Maybe more time in the oven would fix this? Or perhaps frying vs. baking? 

Wonton Cups

Ingredients:
- 1 package of wonton skins

Steps:
(1) Preheat oven to 350
(2) Grease a mini muffin pan.
(3) Press a single wonton skin into each muffin cup. Make sure the skin doesn't fold in too much -- there needs to be enough space to fill with good stuff.
(4) Bake for 7-9 minutes, until lightly brown and crispy.
(5) Fill with anything you want, or serve as dip scoops.

Sunday, January 9, 2011

Strawberry Shortcake


Mmmm, strawberry shortcake. I've been dying to make this since I saw the recipe posted on The Art of Being Perfect. Of course, things being what they are in my kitchen, I had issues with one of the key ingredients -- the strawberries. I'm pretty sure strawberries aren't in season anymore, and there was no way the sad, wrinkled specimens on display in my local grocery store were going into my shortcake. Fortunately, I had a big bag of frozen strawberries in the freezer. Unfortunately, I'd forgotten that that particular bag of frozen strawberries had thawed then re-frozen into one big red mess a few months ago.

So, instead of adorning my cake with fat, juicy strawberries, I found myself hacking at the big red ice block for pieces of fruit to cook down into preserves. Strawberry shortcake is still strawberry shortcake if the strawberries are syrupy, right?

(The cream is melting because I spooned the strawberries on while hot.)

Technically correct or not, this was the most delicious dessert I've eaten in a long time. The cake was light and fluffy, with a pleasant vanilla flavor accentuated by the sweet, fresh whipped cream. And the strawberry preserves? Perfect! The cooking really brought out the natural flavor of the fruit, and produced an intensely strawberry-flavored syrup that saturated the light cake with deliciousness. YUM. Definitely a must-try.

Recipe can be found here, courtesy of The Art of Being Perfect.
** Just a quick note about the recipe -- I couldn't find self-rising flour at the store, so I had to look up a substitute. 1 cup of self-rising flour = 1 cup all purpose + 1-1/4 tsp baking powder + 1/8 tsp salt.

Wednesday, January 5, 2011

Baked Macaroni and Cheese


Growing up, I was never a fan of mac n' cheese. My only experiences with it were (1) at school, the goopy orange stuff congealing (uneaten) on my lunch tray, (2) on TV, in commercials with that orange dinosaur swimming in rivers of cheese sauce, and (3) at Dan's fraternity, watching his brothers suck down endless bowls of the stuff after a night of drinking. Gross. 


It wasn't until this past year that I discovered the joys of grown-up, home-made, baked mac n' cheese. I think it was the combination of endless Food Network shows extolling the virtues of the stuff, and delicious sounding gourmet mac n' cheese offerings (mmm, lobster mac...) on numerous restaurant menus that finally crumbled my resistance. Thank god. I'm discovering more and more that there is really no place for random food grudges in good eating/cooking.

I've made this baked mac n' cheese dish a few times now -- when I make glazed pork chops, actually -- and it is amazing! The noodles are soft and chewy, drenched in delicious cheese sauce, and the crunchy, buttery bread crumbs on top are a delightful textural surprise. This is a million times better than Kraft mac n' cheese, I promise.

Recipe can be found here, courtesy of Alton Brown.

Sunday, December 12, 2010

Almost No-Bake Cheesecake


True or false: I have been dying to get my hands on some mini spring-form pans so that I can make adorable, baby-sized cheesecakes? True. So true! I'm a total sucker for miniaturized versions of regular things. In college, my dorm was filled with all kinds of crap that I bought for the sole reason that they were tiny and cute. Miniature condiment jars, tiny milk cartons full of candy, baby staplers...I've gotten better with age, but sometimes I still can't help myself.


Look at how cute my new pans are! And they're so useful for portion-control. Now, instead of filling my fridge with a full-sized, fat-filled cheesecake, I can make tiny, guilt-free portions of the same delicious treat. Nevermind that Dan thinks it defeats the purpose when I end up making four mini-cheesecakes per batch anyway...


The beauty of this cheesecake is that it doesn't need to be baked. It just gets mixed and chilled over night before being served. The only reason it's called "Almost No-Bake Cheesecake" instead of "No-Bake Cheesecake" is that the graham cracker crusts spend a little time in the oven before the filling goes on top. Still, the cheesecake itself doesn't need to be baked at all.


This was my first time eating un-baked cheesecake, but I've decided that I'm never going back to baked cheesecake again. Each bite was just so light and fluffy in it's creaminess, not super dense like a regular cheesecake. And, whereas regular cheesecake sits like a rock in your stomach after just one slice, this cake slides down so easy and you don't feel like you've eaten much of anything at all. Guilt free! And...very dangerous for dieters! It's like Emily said after we demolished an entire cheesecake despite being uncomfortably full from lunch -- "It's scary how easy it is to eat this."

Almost No-Bake Cheesecake (Adapted from Closet Cooking's No-Bake Cheesecake recipe)

Ingredients: Makes enough for 2 4-inch springform pans.
(Crust)
- 1/2 cup crushed graham cracker crumbs. (About 8 crackers)
- 1 tbsp melted butter
- 1-1/2 tbsp brown sugar

(Filling)
- 8oz cream cheese
- 1/2 cup heavy cream, whipped
- 1 tbsp lemon juice
- 1/4 cup sugar

Steps:
(1) Preheat oven to 325.
(2) Mix graham cracker crumbs, melted butter and brown sugar. Press into the bottoms of 2 4-inch spring form pans.
(3) Bake crust for 8 minutes. Set aside.
(4) In a large bowl, whip heavy cream with an electric beater until thick. Set aside.
(5) In a medium bowl, cream together sugar, lemon juice, and cream cheese. Gently fold into whipped cream mixture until well combined.
(6) Evenly divide filling between two pans, pouring it on top of the crust in each pan.
(7) Chill in the fridge overnight.
(8) Serve plain or with fruit topping.

Monday, November 1, 2010

Stuffed Pasta Shells


Man, it's been a while since my last post! It's not that I haven't been cooking -- I have, I swear. Pork chops, stuffed chicken breasts, soy-glazed salmon, etc. I just haven't been able to find time to take pictures/blog about it. I started my clerkship back in September, and then Dan and I moved into our new condo -- between commuting to/from work, buying a car, furnishing the condo, and getting lost in our new neighborhood on almost a daily basis, I barely have the energy to wolf down my dinner before it's time to fall into bed.


We also adopted a kitten, so a lot of our time in the evenings is spent trying to buy her love with food and belly rubs. She's definitely getting a little spoiled by all the attention. Her new favorite activity is jumping into bed with us way too early in the morning and making a nuisance of herself until one of us surrenders and gets up to feed her. Just this morning I was woken up by the little fur ball at 5:30am -- come to think of it, maybe this is why I've been too tired in the evenings to cook/take pictures/blog.


Today was the first day in a long time that I had a chance to cook at a leisurely pace. Emily and Smriti came over to see the new place and meet my kitty, and I decided to feed them too.


The pasta shells were stuffed and baked in less than an hour, smothered in cream sauce, and heartily enjoyed with garlic bread and glasses of wine. Delicious! (And even better cold the next day)

Stuffed Pasta Shells: (From...Food Network, I think)

Ingredients:
- 12 jumbo pasta shells

(Filling)
- 2-1/2 cups ricotta
- 1/2 cup grated Parmesan
- 1 tbsp olive oil
- 2 cloves garlic, minced
- 2 cups spinach
- 2 cups chopped cooked chicken (I used mushrooms this time)
- 1/2 tsp salt
- 1/4 tsp ground black pepper.

(Sauce)
- 4 tbsp butter
- 1 clove garlic, inced
- 2 tbsp flour
- 2 cups heavy cream
- 1/2 cup milk
- 3 tbsp chopped chives or green onions
- 1 cup grated Parmesan
- 1 cup chopped tomatoes

Steps:
(1) Preheat oven to 350.
(2) Butter 9x13 glass baking dish. Set aside.
(3) Boil medium pot of water. Add pasta shells and cook for about 9 minutes until al dente. Drain and rinse. Set aside.
(4) In large bowl, mix ricotta and Parmesan.
(5) In medium skillet over medium heat, add garlic, spinach, and mushrooms. Stir until spinach is wilted and mushrooms are soft. Remove from heat and let cool for 10 minutes.
(6) Add spinach/mushroom mixture to cheese mixture. Combine well.
(7) Stuff each shell with a heaping spoonful of the filling and line them up in the baking dish.
(8) For the sauce, heat the butter in a sauce. Add garlic and flour, whisk until smooth. Gradually add cream and milk. Whisk until mixture begins to thicken and bubble. Remove from heat and add chives, 1 cup Parmesan, and tomatoes. Pour over shells.
(9) Bake for 30 minutes.

Tuesday, April 27, 2010

Spinach & Mushroom Fettuccine Alfredo


Why is the weather in New England so crappy? I've been in Massachusetts for almost two days already, and I have yet to experience anything but ominous-looking clouds, wind, and rain. The only upside to this crappy weather is that it gives me an excuse to cook creamy, rich, hot comfort food that would be way too heavy on a warm day.


Dan and I weren't feeling up to dealing with raw meat today, and he hates grocery shopping with me (I get too excited by all the food possibilities, apparently), so we stuck to the produce aisle for dinner. Spinach and mushrooms are a timeless combo, and great in cream-based sauces.


"Don't crowd the mushrooms!" OK, Julia. I didn't crowd the mushrooms -- at least, not as much as I usually do. And you know what? They cooked faster!


I forgot how much spinach wilts. I started out with a big ol' pile of leaves, and in seconds they had cooked down to a mere mouthful. Luckily spinach is both healthy and delicious, so I didn't think twice about tossing in a few extra handfuls.


Alfredo sauce stresses me out. I'm not a patient person, and it always feels like takes so long for the cream to thicken up, no matter how much I whisk. But shredded Parmesan cheese and a few teaspoons of flour do wonders, and by the time the everything is bubbling, the sauce is just perfect.


The afredo was hot and creamy and satisfying -- perfect for a cold spring day in Massachusetts.


Spinach & Mushroom Alfredo (Adapted from Cooks.com recipe)

Ingredients:
- 3 cups spinach
- 2 cups mushrooms
- 2 cloves garlic, chopped
- 3 tbsp butter
- 2 cups cream
- 1-1/2 grated Parmesan cheese
- 3 tsp flour
- Pinch of salt
- 1/2 box fettuccine noodles

Steps:
(1) Bring 4 quarts water to a boil. Cook fettuccine until soft, stirring constantly to make sure the noodles don't stick. Add pinch of salt. Drain and set aside.
(2) Melt butter in a skillet. Saute garlic in the skillet on medium heat for about a minute.
(3) Add mushrooms to skillet, making sure to spread them out evenly. Cook until soft and brown.
(4) Add spinach, cook until wilted.
(5) Pour cream into skillet, whisking constantly until it begins to thicken.
(6) Add Parmesan and flour. Keep whisking for about three minutes. Add salt to taste.
(7) Take off heat. Add noodles, combining until each noodle is well-coated with sauce.
(8) Serve while hot.

Sunday, April 25, 2010

Chocolate Coffee Ice Cream Cake


Now that I'm free and in the clear school-wise, my friends have been sending me links to recipes they know I have plenty of time to try out. This unique ice cream cake was at the top of the "Tina, please make this for us!" list. 


The recipe called for cake mix. Usually, I try to stay away from boxed mixes. I just feel so much more accomplished when I make things from scratch, you know? But no one can a culinary superstar all the time, and there's just no denying that sometimes boxed mixes just taste better.


So, what's so special about this cake? It's made with ice cream! But not like a Baskin Robbins ice cream cake, where there's a layer of ice cream sandwiched between layers of cake. Here, the ice cream is literally mixed into the batter. For this cake, I chose coffee flavored ice cream.


The ice cream in this recipe acts like a substitute for milk in a regular chocolate cake, but the resulting batter is a lot creamier in consistency.


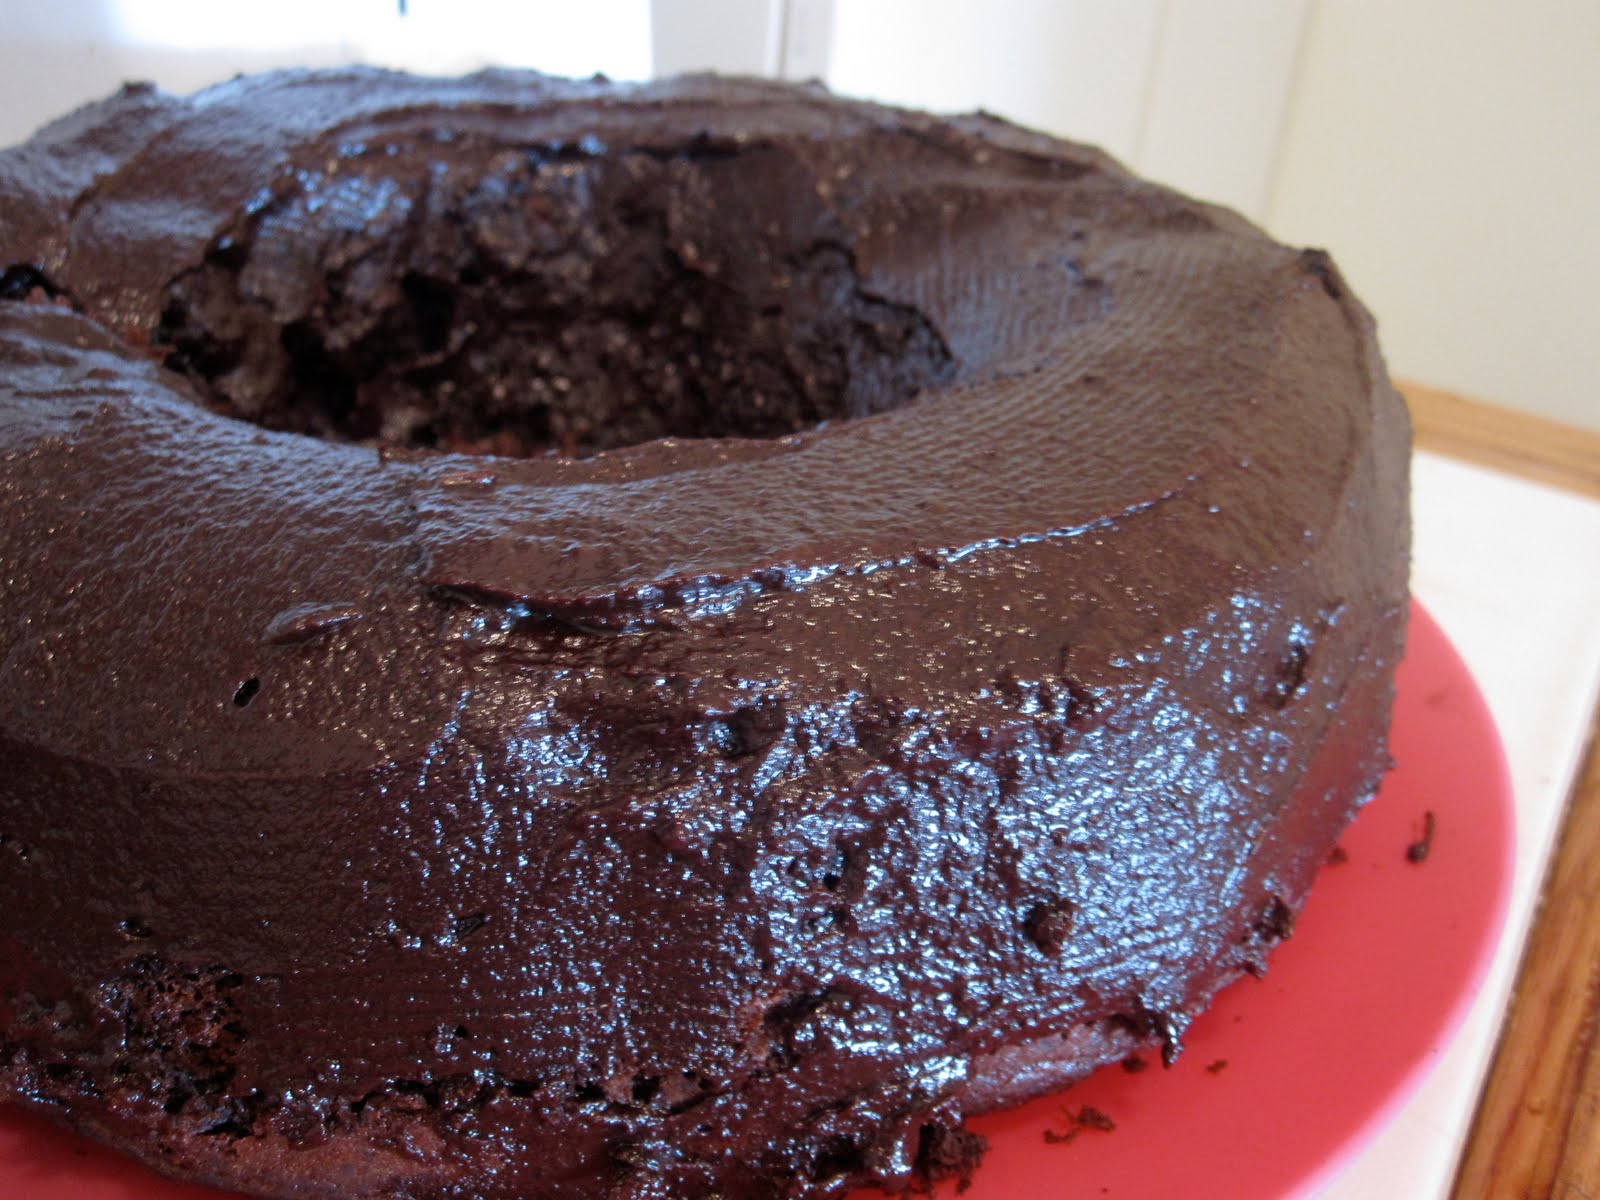
The batter looks a lot like melted ice cream going into the oven, but it turns out to be a pretty nice cake. Just be sure to thoroughly grease and flour (I dusted with cocoa powder) your bundt cake pan, or you'll end up with only half the cake on your plate like I did. Ugh.


I am absolutely going to add ice cream to every cake I bake from now on. I couldn't really taste coffee at all, but the cake was unbelievably moist and soft -- probably the best cake I've ever made. Chocolate ganache was a great touch, but the cake is so good by itself I may not use any kind of icing next time.

Recipe and backstory can be found here.