Showing posts with label American. Show all posts

Sunday, September 25, 2011

S'mores Pie


Call me crazy, but in my mind s'mores are a fall treat, not summer. I know, I know...summer camp and overnight camping trips --> camp fires --> s'mores and ghost stories. Camp fires remind me of autumn and cold weather, though. Maybe it's because I went to math camp instead of summer camp. Or, maybe it's because when I see a roaring fire burning real wood, I think of cool New England nights in Massachusetts with Dan's family. Either way, the only time I crave s'mores is when there's a chill in the air. And folks, it's starting to get nippy hereabouts...


If you're an avid FoodGawker, you'll know that this S'mores Pie is actually an imitation of the S'mores Bars posted by Endless Simmer blog last week. I tried to follow their recipe, but I couldn't get 2 cups of graham cracker crumbs to cover the bottom of an 11x13 baking dish and still come out as thick as the bars pictured in the original post. So, I made some adjustments to the recipe, put everything together in a pie dish, and called this sucker a s'mores pie. See, potential employers? I am creative and think well on my feet.


The Endless Simmer's trick of mixing Cocoa Pebbles into the chocolate layer of this pie is genius. Without the flavor/textural contrast provided by the cereal, this pie would pretty much be a giant chunk of chocolate with some marshmallows on top. Not that that wouldn't be delicious, but it would certainly be much harder to eat in one sitting. The Cocoa Pebbles really helps cut the richness of the pie and provide an interesting crunch that makes this treat extra addictive. I guarantee you won't be able to stop at just one piece. 

S'mores Pie (Adapted from the Endless Simmer blog's recipe)

Ingredients:
(Crust)
- 2 cups graham cracker crumbs
- 2 tbsp sugar
- 6 tbsp melted butter

(Filling)
- 12 oz dark chocolate
- 2/3 cup skim milk
- 2 cups Cocoa Pebbles
- 1 cup mini marshmallows

(Topping)
- 2 cups mini marshmallows

Steps:
(1) Preheat oven to 350.
(2) In a medium bowl, mix graham cracker crumbs, sugar, and melted butter in a bowl. Mix well.
(3) Firmly press mixture into the bottom of a pie dish. Bake for 10-12 minutes. Set aside and cool.
(4) In a sauce pan/pot, melt chocolate with milk over medium/low heat. Whisk until smooth. Cool for about 10 minutes.
(5) Add Cocoa Pebbles and 1 cup marshmallows to cooled chocolate. Mix until well-combined.
(6) Pour chocolate mixture over graham cracker crust.
(7) Pour remaining 2 cups mini marshmallows on top of the pie. Press down slightly to help them stick.
(8) Transfer pie to broiler for about 2 minutes to lightly toast the marshmallows.
** Keep an eye on your marshmallows while they're under the broiler. I forgot how powerful my oven was, and my marshmallows got a little too toasty. I personally like crispy 'mallows, but I had to pull off a lot of burnt bits for the pie's beauty shots. I would recommend broiling for about 30 seconds to 1 minute and then deciding if you want to keep your pie in the oven longer after that.
(9) Chill for a couple hours, then slice up and serve with a big glass of milk.

For other great recipe ideas, click here or here.

Thursday, September 22, 2011

Dan in the Kitchen -- Ranch Burgers


Yesterday, I made a batch of brioche buns with hamburgers in mind. But, they turned out to be small and biscuit-like, so I decided to eat them for breakfast instead, maybe slathered with a little jam or cherry butter. Problem is, there are a lot of buns, and I don't actually eat breakfast much. Dan doesn't either, unless it's a muffin or bagel. Hmm.


My main concern with using the brioche buns for burgers was that they wouldn't be sturdy enough to stand up to a thick, juicy patty. Dan thought they would work though, so...hello, Dan in the Kitchen #4! I'm always happy to stand aside and let someone else cook dinner.


These ranch burgers were inspired by one of the Ranch dressing commercials -- you know, the one where a woman is cooking dinner for her family and she decides to throw a packet of Ranch powder into a bowl of ground beef to give her burgers extra flavor. Seemed like a tasty idea, so we decided to give it a try.


Honestly? Couldn't really taste the Ranch. The burgers were juicy and meaty, but I think our beef to Ranch ratio was too skewed in favor of beef to taste anything other than cow. We'll have to try using two packets of Ranch next time. (Oh, and the buns held up just fine! They're sturdier than they look.)

Ranch Burgers

Ingredients:
- 1/2 lb ground beef
- 1 to 2 packets Ranch dressing powder
- 2 brioche buns

Steps:
(1) Fire up your outdoor grill, or set your indoor grill to "high."
(2) In a large bowl, mix Ranch powder and ground beef until well mixed.
(3) Divide your ground beef into two portions, and shape them into patties.
** Note from Dan: Ground meat is really gross, and working with it by hand is not the greatest sensation. But, you have to suck it up and pack your patties firmly, or you'll end up with a crumbly burger.
(4) Grill your patties for about 4-5 minutes on each side. Resist the urge to flip constantly.
(5) Slice brioche buns in half, and lay them on the grill for about a minute.
(6) Slide your burgers onto your toasted buns.
(7) Eat hot, with all the fixings.

Tuesday, September 13, 2011

Pepperoni Pizza Puffs


First Patriots game of the season was last night, and Dan was giddy with excitement. Me? Not so much. As dreamy as Tom Brady is, my favorite part of watching football is the eating. Chips and dips...wings...pizza. Mmm, junk food!

I saw this recipe for pizza puffs on FoodGawker and knew right away that I was going to have to make them. The ingredients were all things I had laying around, the prep/cook time was short, and the recipe just looked/sounded really tasty. 


These puffs are seriously delightful, guys. They taste exactly like pizza, but fluffier. And, because they're bite-sized, they're extra easy to eat. You pop one in your mouth, chew, savor the deliciously cheesy flavor, and the next thing you know the whole plate is gone. Definitely a great addition to the list of appetizers/snacks that will help get me through football season.

Pepperoni Pizza Puffs (Adapted from the Kirbie's Cravings recipe)

Ingredients:
- 3/4 cup flour
- 3/4 cup milk
- 1 tsp baking powder
- 1 cup shredded cheese (I used Parmesan and Colby Jack)
- 1 large egg
- 1/2 cup green onions, chopped
- 1/3 cup pepperoni, chopped/diced
- Salt/pepper to taste
- Italian seasoning

Steps:
(1) Preheat oven to 400, and grease a mini-muffin pan.
(2) In a large bowl, mix everything but the Italian seasoning.
** You should get a batter that's slightly less thick than pancake batter.
(3) Scoop batter into the cups of the mini-muffin pan, about 2/3 full. Sprinkle some Italian seasoning on top of the batter in each cup.
(4) Bake 10-12 minutes.
(5) Serve warm with a side of marinara or pasta sauce.

For other great recipe ideas, click here.

Sunday, September 11, 2011

Dan in the Kitchen -- Roasted Parsley and Garlic Baby Potatoes


So, last year I cooked my mom a delicious Chinese birthday lunch, complete with a homemade Chinese bakery-style birthday cake. For my dad's birthday a few months before that, we went to Red Lobster and got him one of those giant fruit tarts from Safeway. Looking back, that didn't seem fair, since my dad is pretty frickin' awesome and definitely deserved to eat something other than rubbery fried seafood and cheesy garlic biscuits on his big day (even if those biscuits are delicious). So, this year I decided to rectify the situation and cook him a delicious and elaborate birthday lunch. On the menu: roast chicken, grilled salmon, tomato-mozzarella crostini, roasted asparagus, creamed spinach, and roasted parsley & garlic baby potatoes. And for dessert, a Chinese bakery-style birthday cake with strawberry mousse filling.


One slight problem with my grand plans -- my parents were scheduled to come over at noon today, but Dan and I decided to go camping with our friend Andy in West Virginia yesterday and didn't make it back home until 10:30 this morning. So that's roughly 1.5 hours to roast a chicken, grill some salmon, throw together all of the other appetizers and sides, and bake a cake. Yikes.


Thank God for Dan. Despite getting up at 6:30 this morning, driving 130 miles straight (and therefore not being able to nap in the car like I did), and not having time for a bathroom break, he offered to take over some of the cooking duties. Most of them, actually. In the end, all I had to do was roast a chicken, slap salmon on a pan and make a cake; Dan took care of the spinach, asparagus, crostini, and potatoes. 


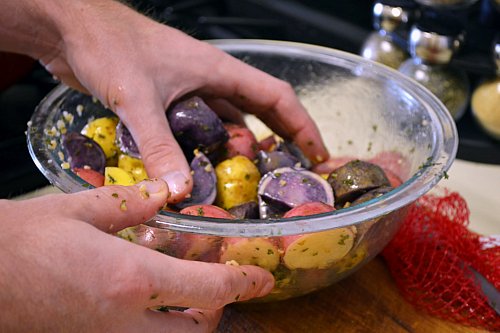
There wasn't time to take pictures of Dan doing everything in the kitchen, so "Dan in the Kitchen: Part 3" only showcases him making roasted baby potatoes. Really yummy, garlicky, crispy-on-the-outside-but-soft-on-the-inside potatoes drenched in olive oil. So. Good.


In case you're wondering, my dad enjoyed all the food immensely, and ate multiple helpings of everything. And, he was especially pleased that Dan had a hand in putting together his lunch. Dan earned so many brownie points with everyone today. Seriously.

Roasted Parsley and Garlic Baby Potatoes (Adapted from the Unsophisticook's recipe)

Ingredients:
- 2 lb mixed bag of baby potatoes (Our bag had Yukon, Russet, and some type of purple potato. The original recipe used fingerling potatoes, so that's fine too.)
- 3 tbsp olive oil
- 1 tbsp minced garlic
- 1-1/2 tbsp dried parsley
- Salt/pepper to taste (Dan used 1-1/2 tbsp salt)

Steps:
(1) Preheat oven to 425.
(2) In a large bowl, whisk together olive oil, garlic, parsley, salt and pepper.
(3) Cut potatoes into halves or fourths, depending on how big/small you want your pieces to be.
(4) Toss the potatoes in the olive oil mixture.
** Tip from Dan: Really get your hands in there. You want to get olive oil on EVERYTHING.
(5) Spread potatoes out in a single layer on a baking sheet.
(6) Roast for about 35 minutes.
(7) Serve hot, with roast chicken and fresh bread. (But, also really tasty eaten cold by themselves.)

Tuesday, August 30, 2011

Blueberry Muffins


I woke up this morning with the most intense craving for a gigantic blueberry muffin. You know, one of those sugar-crusted monstrosities from Costco that's packed to bursting with fat blueberries. Those things are so bad for you, but they're so delicious! They're really just dessert masquerading as breakfast. (Which is fine by me -- my parents used to let me eat cake and pie and ice cream for breakfast all the time.)


These days, my metabolism really can't handle actual desserts or an entire Costco muffin for breakfast anymore, but I can certainly put away a whole bunch of these equally yummy, normal-sized muffins. There is less than a cup of sugar in the whole batch, and two cups of fresh, juicy berries go into the batter. I'm pretty sure one of these muffins satisfies at least one daily recommended serving of fruit...maybe.

Blueberry Muffins (Adapted from the Mochi Thoughts recipe)

Ingredients: (Makes exactly 1 dozen muffins)
- 1-1/2 cups flour
- 3/4 cup white sugar
- 1 tsp salt
- 2 tsp baking powder
- 1/3 cup vegetable oil
- 1 large egg
- A little over 1/3 cup milk
- 2 cups fresh blueberries

Steps:
(1) Preheat oven to 400, and fill a muffin tin with cupcake liners.
(2) In a large bowl, mix all the dry ingredients until well combined.
(3) Slowly stir in the oil and egg. Batter should be very thick.
(4) Add milk. If 1/3 cup is not enough to thin out the batter, add more slowly.
** I used between 1/3 and 1/2 cup total. Batter should be a little thicker than pancake batter.
(5) Gently mix in blueberries.
(6) Scoop about 1/4 cup batter into each muffin cup.
(7) Gently press 3-4 blueberries onto the top of the batter in each muffin cup. The batter should be thick enough that the blueberries won't sink in.
(8) Bake for 20 minutes.
(9) Best eaten warm, but delicious any time.

For other great food ideas, click here or here.

Thursday, August 25, 2011

Cayenne-Cinnamon Baby Back Ribs


Whoa, two posts in one day, what's going on??? Unemployment, that's what. No, I wasn't fired. And no, I wasn't laid off. My judicial clerkship ended yesterday. Can you believe how quickly a whole year passed? It's been over a year since I graduated law school, one year since I took the bar exam, and 8 months since I got sworn in as a brand spanking new attorney. Oh, how time flies...

So, what's next? Nothing just yet, but I'm looking. It's kind of scary to be moving forward without a concrete plan, but I'm pretty sure it'll be OK. I've got a solid resume with a lot of good work experience, there are plenty of legal job search directories out there, and I've got Dan + my parents rooting for me. In the meantime, I'm just going to be a job application-mailing, food-blogging machine.


Anyway, enough about me. Lets get back to the really important stuff -- ribs. Juicy, meaty, glazed ribs. Ribs that ooze fatty, salty, porky juices with every bite. Ribs that were rubbed, roasted, glazed, broiled, and ready to eat in under two hours. Ribs so good that between dinner last night and lunch today, all 6 pounds of them are gone.


This was my first time making ribs, and I was under a bit of a time crunch. Usually, stuff like this need to cook for several hours on low heat to get that lovely fall-off-the-bone quality. Unfortunately, I didn't have several hours. I didn't get home from work until after 6pm, and my guests were scheduled to arrive at 7:30. Luckily, the Steamy Kitchen blog had a rib recipe that involved cooking the meat at slightly higher heat for less time. 

Because I was cooking 6 pounds of meat instead of 3, I actually had to keep my ribs in the oven for a little longer than the recipe called for -- after one hour, some of the meat was still bloody. I probably should have cooked everything even longer than I ultimately did, because the meat didn't fall off the bone like it was supposed to. Still, the ribs were still very tasty, and my guests had no complaints. I think my friend Andrew ate over a pound of meat by himself! Awesome.

Recipe can be found here, courtesy of the Steamy Kitchen blog.
(Her pictures make these ribs look way more delicious than mine do...)


For other great recipes, click here or here.

Dan in the Kitchen -- Creamed Spinach


Dan's back in the kitchen folks, and this time he's making creamed spinach for a cozy little dinner party. As my "sous-chef", he technically had a hand in every other dish served -- shredding cheese for the mac n' cheese, mashing potatoes for the garlic mashed potatoes, etc. -- but this was the dish that he was entirely responsible for from start to finish. I actually wanted to put him in charge of cooking the pork ribs, but he said that was more of a "Tina in the Kitchen" endeavor. Oh well. Next time...


Creamed spinach is one of our favorite steakhouse sides -- it's creamy, savory, and super delicious. But, considering how cheap the ingredients are and how easy it is to make, especially if you're using pre-cooked/chopped frozen spinach, it's kind of a rip off that most restaurants charge $7 for a bowl of the stuff.  


All you have to do is saute some garlic in butter, dump cooked/chopped spinach into the pot, add cream, stir, season, and let the whole thing simmer into perfection. 


Voila, creamed spinach! So easy, a caveman -- or, an inexperienced cook who needs very exact, step-by-step instructions** -- can do it. 

** Based on suggestions from numerous people, I showed Dan the "Cooking for Engineers" blog. Unsurprisingly, he found the cooking flowcharts to be incredibly logical and understandable. We'll definitely have to start using recipes from that blog!

Creamed Spinach (Adapted from Emeril Lagasse's recipe)

Ingredients:
- 1 package frozen pre-cooked/chopped spinach, thawed
- 1 cup cream
- 3 tbsp butter
- 1 tbsp minced garlic
- A pinch of nutmeg
- Salt/pepper to taste

Steps:
(1) In a pot, melt butter on medium heat.
(2) Add minced garlic, cook until lightly soft and fragrant, about a minute.
(3) Scoop all the spinach into the pot, and stir to allow the greens to soak up the garlicky butter, as well as break up any lumps in the spinach. Cook until liquid is released.
(4) Add cream, salt, pepper, and nutmeg. Cook until the liquid has reduced to approximately half the original amount, about 4-5 minutes.
** Seasoning note from Dan -- if you're adding salt straight from the canister, do so with a gentle side to side shaking motion rather than a down-up pouring motion. This will help you control the speed at which salt is added, as well as the amount of salt that goes into the dish. Gently shake a little salt over every part of the pot, stir, and taste. If it's not salty enough, add more.
(5) Remove from heat and serve right away.
** Since this dish comes together so quickly, it's best to make it last so that it doesn't just sit around and congeal while the other food is being cooked. 

Monday, August 22, 2011

Dan in the Kitchen -- Grilled Cream Cheese and Colby Jack Sandwich


So, I'd like to introduce a new series of posts called "Dan in the Kitchen," where I document Dan's forays into the kitchen. I figure since I'm not always in the mood to cook, but we still need to eat, everyone would benefit from Dan gaining some cooking skills. Until we moved in together, pretty much all Dan ate was buffalo chicken subs from the student center deli, Cheez-its and pasta with bottled spaghetti sauce. To this day, if I'm not around for dinner, or if I don't feel like cooking, he'll just have a few beers and a pack of Oreos. So unappetizing, not to mention super unhealthy. I have high hopes that this "Dan in the Kitchen" thing is really going to turn things around for his eating habits. At the very least, this will add some variety to his diet. And, it's going to be fun to teach Dan how to cook!


I'm convinced that Dan could actually be a great cook if he put his mind to it. He's an engineer, so he deals with long, complicated instructions and handles delicate circuitry for a living -- surely he could follow a recipe with equal skill and finesse! I mean, constructing a meal is not so different than building a satellite, right?


The first recipe from Dan in the Kitchen is the humble grilled cheese sandwich, jazzed up with cream cheese and colby jack. OK, so maybe this isn't "healthy" per se, but we have to start somewhere, and this is a straightforward, frills-free recipe that's super delicious and satisfying. Just butter some bread, throw on some cheese, and cook it all on a hot pan. The cream cheese was my idea -- Dan was deeply skeptical, but he was nice enough to let me bully him into using it. 


The cream cheese turned out to be a fantastic idea. It added a whole new level of goeey, tangy, cheesiness to the sandwich that provided a wonderful contrast to the crunchy, buttery bread. The bread was perhaps a little too crunchy, but Dan has always liked his breads a little more toasted than I do. Either way, delicious! Not a bad start for Dan in the Kitchen.

Grilled Cream Cheese and Colby Jack Sandwich

Ingredients:
- 2 slices bread, buttered on both sides
- 1 slab cream cheese
- 1 slice of colby jack cheese

Steps:
(1) Heat a pan on medium heat. When the pan is hot, slap on both pieces of bread.
(2) Toast one side of the bread to golden brown, then flip over and layer with cheese -- cream cheese on one slice, colby jack on the other.
(3) Cook for about 30 seconds, until cheese is slightly melted, then place one piece of bread on top of the other (cheese to cheese) and press down until the two cheeses are molded together.
(4) When the bread is toasted to your satisfaction, and the cheese is perfectly melty and gooey, take your sandwich off the heat and slide it onto a plate.
** If you find (as we did) that your colby jack doesn't melt as nicely as you hoped, stick your sandwich in the oven and broil on low heat for about 3-4 minutes.
(5) Cut in half and enjoy hot with a cold soda and some chips.

Sunday, August 21, 2011

Buttermilk Fried Chicken

(All pictures in this post were taken by Alex Hsu.)

A few weeks ago, right after my Japanese-Style Strawberry Shortcake post, I got a message from my friend Alex asking if I would cook him delicious food for his birthday. He lives in Jersey City and I live in VA, so my first instinct was to say "Haha...good one...no." But, I'm a sucker for compliments about my cooking, and I like to feed people, so I told him I'd do it. I didn't think to run the idea by Dan until after I had already committed us to a road trip, but to his credit he just rolled his eyes and said "Guess I need to take some time off on Friday..."


When I asked Alex what he wanted for dinner, his response was "Meat. Lots of meat." Well. That's helpful. I knew he was inviting a bunch of people over, and I was pretty sure I wouldn't make it to Jersey City before 5pm, so my main concern was feeding a lot of people and being done with all the cooking by the time everyone showed up at 7pm. I knew right away that my sides would be chive-garlic mashed potatoes, baked mac n cheese, and roasted carrots -- they're easy to make, very filling, and I can pretty much put them on the stove and forget about them while I cook the main course. With those sides decided, it was pretty clear I was going to have to make fried chicken to accompany all those carbs. Alex was going to get a good ol' Southern-style birthday dinner.


Have I ever made fried chicken before this dinner? Nope. Is it a good idea to cook something totally new and unfamiliar for a lot of people on short notice? Not really. But hey, lets live on the edge a little. Fortunately, Alex's roommate bought all the ingredients a few days ahead of time, and our friend Andy was hanging around the apartment all day, so all I had to do was tell Andy to soak the chicken in buttermilk and we were good to go.  When Dan and I finally made it to the apartment, I got right to work on the chicken. I tossed together large amounts of flour, salt, pepper, paprika, and garlic powder for the breading, threw the buttermilk-soaked chicken directly into the dry mixture to coat, and pan-fried everything in very hot vegetable oil. I honestly didn't have high hopes, but the chicken turned out to be amazingly delicious. At least, the pieces that I didn't flip obsessively and actually cooked all the way through were delicious -- there were definitely some pieces that were kinda sorta really raw near the bone. Oops.

Thankfully, Alex ate the good pieces and was pretty happy with his meal. He had multiple helpings of everything, and that made me happy. But when he told me I should open my own fried chicken joint, I just laughed nervously and casually slid the under-cooked pieces away from his plate. What he doesn't know can't hurt him, right?

Buttermilk Fried Chicken

Ingredients: (I sort of haphazardly threw ingredients into a bowl when I made my chicken, so these measurements are my best guesses for how much of everything I used.)
- 1 whole chicken, cut into 8 pieces (or, just a whole bunch of wings/legs/whatever)
- 3 cups buttermilk
- 2 cups flour
- 1/4 cup garlic salt
- 1/8 cup paprika
- Lots of salt and pepper (I like my food salty, so I used a lot of salt -- probably about 1/2 cup)
- Lots of vegetable oil (peanut oil would be great too)

Steps:
(1) In a large bowl, pour buttermilk over chicken and soak overnight, or at least a few hours.
(2) In a separate large bowl, mix all the dry ingredients until well-combined.
(3) Fill a wide, heavy-bottomed skillet about half-way full of oil. Heat until very hot -- if you flick flour into the oil, it should immediately sizzle/bubble up.
(4) Throw buttermilk-soaked chicken directly into the bowl containing the flour/seasoning, and toss to coat. Shake off excess breading, then slide the chicken into the bubbling oil.
** The chicken should be mostly covered, but it's fine to have some of it peaking out above the oil. The longer you fry, the less oil you'll have anyway, and you'll be flipping the pieces eventually.
(5) Cook chicken until golden-brown, about 8-10 minutes on each side. Don't overcrowd your skillet -- 3 to 4 pieces at a time is best.
** I would say it's better to over-cook than under-cook in this situation. Do NOT flip your chicken obsessively like I did. Just throw it in there, walk away for a while, then flip once and leave it alone again. The breading will keep the meat nice and juicy, so it's fine to cook the chicken longer. There's nothing grosser than biting into raw/bloody meat near the bone...
(6) Set cooked pieces aside on your serving plate -- don't use paper towels or your chicken will be soggy. Keep frying until all your chicken is done.
(7) Eat immediately with sides of your choice.
** I suggest buttery mashed potatoes, biscuits, greens, and creamy mac n' cheese.


For other great recipe ideas, click here.

Monday, July 18, 2011

Zucchini Bread


This past weekend a bunch of us piled into Dan's tiny Mazda and headed into the boonies of Virginia for some good old fashioned fruit picking. The original plan was to pick peaches and blackberries, but once we got to the farm, we realized they had a whole lot more to offer than just those two fruits. In the end, we came away with a huge bagful of peaches, six ears of corn, and four massive zucchinis. And it only cost us $11!


The peaches will definitely get eaten, and I already have plans to use the corn for upcoming dinners, but I must confess...I have never actually cooked a zucchini. In fact, I've only recently worked up the nerve to try eating zucchini, period. I just don't like squash, you know? But I ate zucchini bread a few weeks ago, and then had some roasted zucchini in a veggie lasagna a few days later. To my surprise, they were both delicious!


With four pounds of zucchini in my fridge, I'm definitely going to have to get inventive with my cooking. Last night we ate one two ways -- oven roasted, drizzled with olive oil and sprinkled with salt; and, breaded then baked into crispy fries. Yum! Zucchini may be my new favorite vegetable. Even so, that leaves...three more gigantic zucchinis in the fridge in the meantime. Yikes. 


So, I decided to try my hand at zucchini bread this morning. The recipe reminded me a lot of carrot cake, which I love -- cake-like batter flavored with vanilla, cinnamon, and nutmeg, and filled with several cups of soft, grated vegetables. Out of the oven, the bread was crusty on the outside and moist on the inside. Not too sweet, with an almost savory after taste from the combination of zucchini and olive oil. Delicious!

Zucchini Bread (Adapted from the Smitten Kitchen's recipe)

Ingredients:
- 2 cups zucchini, grated
- 3 large eggs
- 1 cup olive oil
- 1-1/4 cup sugar
- 2 tsp vanilla
- 1 tsp baking soda
- 1/2 tsp baking powder
- 3 tsp cinnamon
- 1/8 tsp nutmeg
- 1 tsp salt
- 3 cups flour

Steps:
(1) Preheat oven to 350.
(2) In a large bowl, whisk eggs until thick and yellow. Add olive oil, sugar, vanilla and zucchini until well-combined.
(3) In a separate bowl, combine dry ingredients. Slowly add to wet mixture, stirring after each addition until ingredients well combined.
(4) Pour batter into well-greased bread pan. (Smitten Kitchen divided the batter into 2 pans, but my batter fit into one pan.)
(5) Bake for about 50 minutes. Serve warm with tea, or smeared with cream cheese frosting.

Sunday, June 26, 2011

Dulce de Leche-Nutella Swirl Loaf Cake


There are still a few things Dan and I need to do to fully recover from our Great Beach Robbery -- getting new driver's licenses, for example -- but everything is closed on Sundays, so we've been having a pretty lazy day so far. We slept in until the hungry meows of our kitties could no longer be ignored, fed the little beasts, and then promptly collapsed in front of the TV to catch up on all the shows we missed during vacation.


But, once we'd blown through all the eps in our DVR queue, things got real boring real fast. Sundays are just so blah. I don't know about you, but nothing interesting ever happens to us on Sundays, and the day is mostly spent being lazy and dreading the start of the work week. As I type this, Dan is moaning "Boooo, we gotta work tomorrow! Ughhhhhhh." 


You know what's really good for fighting the end-of-weekend blues, though? Cake. Particularly if it's cake made with ice cream, homemade dulce de leche, and Nutella. Mmmm.

For this dulce de leche loaf cake, I found a simple vanilla loaf cake recipe online and modified it to fit my needs. Vanilla ice cream instead of chilled heavy cream; dulce de leche instead of sugar; and Nutella because if I didn't immediately use up the rest of the jar, I was going to keep eating it by the spoonful  and feel guilty. The resulting loaf was moist and sweet on the inside, with a deliciously crunchy Nutella-laced crust. 

Dulce de Leche-Nutella Swirl Loaf Cake

Ingredients:
- 1 cup vanilla ice cream, melted at room temperature.
- 2 large eggs
- 1 tsp vanilla
- 2/3 cup dulce de leche
- 1/2 cup Nutella
- 1-1/2 cups flour
- 2 tsp baking powder
- 1 tsp salt

Steps:
(1) Preheat oven to 350.
(2) In a large bowl, mix together ice cream, eggs, vanilla, and dulce de leche until well-combined. The dulce de leche will make the batter clumpy, but just keep working at it until everything is smooth.
(3) Add dry ingredients.
(4) Pour most of the batter into a greased/floured loaf pan. Save about 1/2 cup for later.
(5) Add nutella to the loaf pan in well-spaced spoonfuls. Top with remaining batter. Then, run a knife through the whole thing to create a nice swirl/marbled pattern.
(6) Bake for 30-40 minutes, or until the cake starts to come away from the side of the pan.
(7) Enjoy alone, with coffee, or smeared with more dulce de leche.

For other delicious chocolate recipes, go here.

Wednesday, May 25, 2011

Classic Lemonade


Man, it was hot today! The weatherman predicted thunderstorms all week, but there was nary a raindrop or storm cloud in sight. By the time I got home it was 88 and sunny. And just a little muggy, 'cuz you know, it's summer in Virginia. Basically, it was the perfect day for an icy cold pitcher of fresh, homemade lemonade. 


Times like these, I really wish we had furniture on our balcony. Can you imagine how amazing it would be to recline in a lounge chair on the balcony after work, sipping from a frosty glass of lemonade, enjoying life and basking in the warmth of the fading sun? That's like, poetry, almost.


But, without the aforementioned lounge chair on my balcony, I had to settle for enjoying this tasty lemonade on the couch while watching back to back episodes of Bones on TBS. Not such a terrible way to spend the evening.

Lemonade (From Simply Recipes)

Ingredients:
- 1 cup water, plus 3-5 more cups for dilution
- 1 cup sugar
- 1 cup lemon juice

Steps:
(1) Make simple syrup by boiling sugar and 1 cup water until sugar is completely dissolved.
(2) Pour syrup and lemon juice into a pitcher, along with 3-5 cups of water, depending on how much you want to dilute the sweetness of the lemonade. (I went with 5 cups, and the lemonade was plenty sweet.)
(3) Refrigerate until you're ready to serve, or load the pitcher up with ice cubes.
(4) Stir and enjoy cold. Preferably on a balcony on a nice warm day.

Monday, May 23, 2011

Cheddar-Stuffed Jalapeno Burger


Dan was jonesing hard for Five Guy's  and Ray's Hell Burger this weekend. Who can blame him? They've got amazing burgers! But, getting to Five Guy's meant spending 30 minutes in intense local traffic, and Ray's Hell Burger is always packed to the gills on weekends, so neither option seemed particularly appealing.  We didn't want to give up burgers altogether though, so we decided to buy ground beef and make/grill our own. What a great idea that was! The smell of grilled burgers is such a nice, summery smell, isn't it? And, the homemade burgers were unbelievably yummy -- juicy and bursting with flavor. So good, in fact, that we ended up making them for dinner two nights in a row.

This picture doesn't do a good job of capturing how massive this burger was, but trust me...it was huge. Dan and I each ate half and felt completely stuffed. And just look at that crispy bacon, thick patty and oozing cheese. So. Good.

Cheddar-Stuffed Jalapeno Burger

Ingredients: (Makes one very large burger)
- 2/3 lb ground beef
- 1 jalapeno pepper, chopped into little pieces
- 1 handful of grated cheddar
- 1 tbsp onion powder
- 1 tbsp salt

Steps:
(1) In a large bowl, combined ground beef, chopped peppers, salt, and onion powder. Mix well, then divide into 2 portions of equal size.
(2) Take one portion of ground beef and shape it into a large patty, about 1/2 inch thick and 4 inches in diameter.
(3) Spoon grated cheese into the center of the patty, leaving about half an inch to 1 inch around the edges uncovered for sealing.
(4) Shape second patty into roughly the same size and shape as the first. Carefully lay it on top of the first patty, and press down on the edges to seal.
(5) Turn giant patty over and make sure there are no cracks in the meat. Shape to your satisfaction, then slap it on the grill!
(6) Grill on high for about 7 minutes, flipping after a couple minutes on each side.
(7) Serve on a large kaiser roll, with tomatoes, lettuce, and condiments of your choosing.

Wednesday, May 18, 2011

Chicken Salad Sandwich


I secretly look forward to the days when we run out of deli turkey. Why? Because it gives me an excuse to make chicken salad. I mean, I could probably just make chicken salad whenever, but turkey goes bad so quickly that I feel like I have to eat it for lunch everyday when it's around so that I don't end up throwing any away.

I read in one of my chick lit books that Southern women judge the measure of a lady by the quality of her chicken salad. That can't be true, but if it were...I'd be a pretty low maintenance lady. I don't use chicken that I've personally roasted, I don't make my own mayonnaise, and I don't throw in any fancy pants ingredients for textural/flavor contrast. I just throw some chopped chicken (usually Perdue grilled chicken strips), diced red onion, Helmann's, and paprika in a bowl and mix it all together. Done in fifteen minutes, but super yummy. Great on top of a spinach salad or sandwiched between toasted wheat bread.

Chicken Salad Sandwich

Ingredients:
- 1 packet of Perdue grilled chicken, chopped; or, 1 grilled chicken breast, chopped
- 3 tbsp mayonnaise
- 1 tsp paprika
- 1/4 cup red onion, diced (I like the spicy crunch of red onion in my chicken salad, so I usually use more)
- 1/4 avocado, sliced thinly
- 3 tomato slices
- 4 large lettuce leaves, or 1 handful baby spinach
- 2 slices wheat bread, toasted

Steps:
(1) In a medium bowl, mix chicken, mayo, paprika, and red onion until well combined. (If you're feeling fancy, chop up some green onion or apple slices and throw that in too.)
(2) Layer one slice of toast with lettuce and tomatoes.
(3) Scoop two large spoonfuls of chicken salad on top of the lettuce/tomatoes. Spread out in one even layer.
(4) Arrange avocado slices on top of the chicken salad. Cover with second slice of bread.
(5) Cut in half and serve with pickles and chips.

Tuesday, May 10, 2011

Mango Daiquiris


I think it's pretty obvious by now that I'm a girly drink kind of gal. I mean, I could try to roll with the boys and throw back beers and booze on the rocks, but why suffer? I like sugar. I like fruit. I don't like the taste of alcohol.  It would just be silly to pretend otherwise. Sure, I suppose if I could acquire a taste for beer my bar tabs would be a lot lower, but...not worth it. I need to have fruity, blended drinks in my life, damnit.


Daiquiris are pretty high on my list of favorite blended drinks, not only because they are sweet and fruity and delicious, but also because I associate them with summer, hammocks, sandy beaches, and tropical vacations.  Seriously, there is nothing more relaxing than an icy cold daiquiri, especially after a long and productive day at work. And no fruit is more delicious this time of year than a juicy mango. What happens when you combine the two? Instant happiness, and the perfect cure for the mid-week blues. 

Mango Daiquiris

Ingredients:
- 2 fresh mangos, chopped into pieces
- 2 trays' worth of ice
- 1/4 cup lime juice
- 4 oz rum (I used Parrot Bay Mango Rum for even more mango flavor)
- 1 tbsp sugar

Steps:
(1) Combine all ingredients in blender. Blend until smooth and frosty.
(2) Serve immediately, preferably with a heap of chips and guacamole.

For other great drinks ideas, click here.

Sunday, May 1, 2011

Bananas Foster Trifle


I wanted to make trifles out of my strawberry rum pound cake a couple weeks ago, but my stemless wineglasses proved to be less than satisfactory vessels for putting it all together. Nothing layered properly, and my fingers kept smearing stuff. So, I ordered a set of mini trifle bowls, and they arrived a few days ago.

What is trifle, exactly? It's basically a cake-based parfait, with layers of cake (usually pound or sponge), custard, fruit, gelatin, and whipped cream. Yum, right? I didn't have pound cake or sponge cake lying around, but since there was still some banana bread left over, I decided to make a Bananas Foster trifle.


I originally wanted to make the characteristic Bananas Foster rum sauce for my trifle, but that was a total botch. While it was cooking, I took my eye off the skillet and the sugar burned. The sauce, which had been smelling pretty good up to then, turned black, started smoking, and was basically totally ruined. Ugh. So, I scrapped the sauce and made do with banana bread, cooked bananas, and whipped cream. And you know what? Totally delicious. Banana lovers everywhere would go nuts for this sweet and creamy, intensely banana-y treat. Dan, who had already eaten pizza, chips and salsa, and cheesy bread, and insisted that he was too stuffed to eat more than a few bites of trifle, ate the whole bowl. Mini-bowl, but still.

Bananas Foster Trifle

Ingredients: (Makes 2 mini-trifles)
- 4 pieces banana bread, chopped into squares.
- 1/4 cup brown sugar
- 1/2 stick butter
- 1 dash cinnamon
- 1 dash cloves
- 1 banana, cut in half length-wise
- 1 cup heavy cream, whipped and sweetened.

Steps:
(1) Layer the bottom of each mini-trifle bowl with some of the chopped banana bread, in one even layer. Set aside.
(2) In a skillet, cook butter and brown sugar until simmering. Add spices.
(3) Place both halves of the banana into the skillet and spoon sauce over the top. Cook until a sugary crust forms on the outside of the fruit. Pull out and set aside.
** At this point you can keep cooking the sauce until it is thick and syrupy, then add it as one of your trifle components. Mine burned, so I left it out...
(4) Let bananas cool, then chop them into small pieces.
(5) Layer chopped bananas on top of the banana bread in the trifle bowls.
(6) Layer the remaining banana bread on top of the cooked bananas.
(7) Top with whipped cream. Sprinkle with cinnamon and serve.

One year ago: Chocolate Fudge

Thursday, April 21, 2011

Strawberry Rum Pound Cake


The problem with strawberries is that (1) my grocery store never has the the really fresh-looking ones, and (2) they go bad so quickly. I bought a big carton of promising-looking berries last weekend, and three days later they were dark in patches, simultaneously shriveled and mushy, and giving off faintly alcoholic fumes. Mmm, over-ripe strawberries.


I've been valiantly trying to eat my way through the entire carton of ripe berries all week, but it's pretty much a losing battle; I think the strawberries are actually multiplying in the fridge. As far as I'm concerned, the only way for me to avoid wasting the rest of the fruit is to chop it up and bake it into something delicious. 


A lot of the food bloggers I follow have been making pound cake lately, so I was kind of thinking I should hop on the bandwagon. The only reason I haven't made one yet is because I know how much delicious butter and fat is in pound cake, and if I make it I'm going to want to eat all of it by myself in one sitting, and then I'm going to suffer intense inner turmoil as my greed inevitably overcomes my good sense and health consciousness. 


But, you never know what will happen before you try, so...I threw caution to the wind and decided to go with a Paula Deen recipe. Two sticks of butter, 5 eggs, 2 cups of sugar, and sour cream. I couldn't bring myself to make her sweet glaze for drizzling, but the cake was incredibly delicious even without it. Sweet and buttery, with a pleasant tang from the pieces of strawberry studded throughout, and so moist. Yum. Let me tell you, I am in big trouble. I can only hope Dan eats the rest of the cake before it seriously derails my diet...

Recipe can be found here, courtesy of Paula Deen.
** Her recipe just uses strawberries -- I threw in a tbsp of rum-flavored extract because I thought the flavor would compliment the strawberry pretty well. In the end the rum flavor wasn't as strong as I would have liked...next time I think I'll use actual rum.

One year ago: Pad Thai