Showing posts with label Asian. Show all posts

Monday, September 12, 2011

Chinese Bakery-Style Birthday Cake with Strawberry Mousse Filling


As I mentioned in yesterday's post, I made my dad a Chinese bakery-style cake for his birthday. It was just like the one I made for my mom last year, except instead of using vanilla custard and peaches/kiwis, I filled this one with strawberry mousse and fresh strawberries. I know. I'm on a strawberry kick. What can I say, I'm not ready to let go of summer yet.


Now, everyone knows that I love cake. Chocolate cake, cheesecake, cakes filled with shredded vegetables, loaf cake, cake covered in sugary sweet glaze...I've never met a slice a cake I didn't like. But of all the cakes I've consumed in the last 25 years, I love Chinese bakery-style birthday cakes the most.  Trust me when I say that they are vastly superior to every other cake out there.


They're light and fluffy, not too sweet, filled with fresh fruit, and coated with a light and delicate whipped cream frosting. And, if you sandwich thick strawberry mousse and sliced strawberries between the layers of fluffy cake...heaven. Each bite just melts in your mouth, and you can eat more than one piece without feel queasy or jittery from sugar overload. It's fantastic. Try it!

This recipe is inspired by a recent post from my friend Lucy.

- For directions on how to make the cake base and whipped cream frosting, click here or here.

- For directions on how to make the strawberry mousse, click here.
** I didn't have time to macerate strawberries for the mousse, so I just blended a lot of fresh strawberries with 3/4 cups sugar. That seemed to work just fine.


For other great recipe ideas, click here or here.

*********************************************************************************
BY THE WAY...my friend Melissa started a food blog recently, and she just made a post about Chinese birthday longevity noodles. How appropriate! Show some support for a new member of the food blogging community, and check out her site.

Friday, August 26, 2011

Goat Cheese and Colby Jack Sandwich with Kimchi, Spinach, and a Runny Egg


Guys, I just had the greatest sandwich ever for lunch -- wheat toast, two kinds of melted cheese, spinach, kimchi, and a runny egg. So messy, so flavorful, so amazingly delicious. 


I've learned from reading my friend Sam's food blog this year that a runny egg makes everything extra delicious. And, as everyone knows, kimchi and runny eggs are a match made in foodie heaven. So when you get crazy and throw tangy goat cheese and hearty colby jack into the mix, you get something totally divine. Every bite is a study in flavor and textural contrasts -- salty/soft goat cheese, creamy egg yolk, spicy/tangy/crunchy kimchi, toasted wheat bread, and mellow baked spinach. Yum.


This sandwich probably isn't for everyone, since kimchi is more or less an acquired taste. But, if you took that out you'd still have yourself a deliciously creamy, oozy, egg and cheese sandwich. Great for breakfast, lunch, or dinner.

Goat Cheese and Colby Jack Sandwich with Kimchi, Spinach, and a Runny Egg

Ingredients:
- 2 slices wheat bread
- 1 tbsp goat cheese
- 1 slice colby jack cheese
- 1 egg
- 1 cup spinach
- 1/2 cup kimchi
- Sea salt

Steps:
(1) Preheat oven to 350.
(2) Place colby jack cheese on top of one slice of bread in an even layer. Top with spinach.
(3) Even distribute goat cheese over the second slice of bread.
(4) Slide both pieces of bread into the oven, laying them directly on middle rack.
(5) While you're waiting for the bread to toast and cheese to melt, start cooking your egg. Crack a large egg into a hot pan. Nudge/fold the spreading egg yolk until it's roughly the size/shape of your bread. Cook until egg whites are opaque, and yolk is still runny.
(6) Carefully remove bread from the oven, and slide them onto a plate.
(7) Gently slip your runny egg on top of the spinach-laden bread slice. Sprinkle with sea salt.
(8) Layer kimchi on top of the bread with goat cheese, then combine the two slices into a sandwich.
(9) Cut in half and eat immediately. Sop up all the runny egg yolk with your sandwich as you go.

Friday, August 12, 2011

Loco Moco


Two of my college friends got married in Hawaii recently. (I know. So jealous.) Sadly, I wasn't invited to the wedding -- ahem, Sonia -- but I've been facebook stalking the photo albums of the people who went, so it kind of feels like I was there too. Note to self: must go to Hawaii soon.


From what I can tell, when the wedding guests weren't watching the two love birds join in holy matrimony, they were stuffing their faces with yummy Hawaiian food. Everything looked delicious, but it was the pictures of loco moco that really had me drooling. Rice, gravy, hamburger, and a fried egg? I'm so there! 

The ingredients for loco mocos are simple, the recipe is straightforward, and I was chowing down on a delicious Hawaiian meal in less than 45 minutes. The only way I could have enjoyed this more is if I were eating it in Hawaii. Sigh. (Just kidding -- congratulations, Sonia and Kevin!)

Recipe can be found here, courtesy of the Jun-blog.
** Note: I thought plain ol' meat gravy would be too boring, so I made a cream-based mushroom gravy instead. Super delicious!

Monday, July 11, 2011

Crab Rangoons


So last week I made crab rangoons for the first time. We were in Boston for 4th of July weekend, and one of our friends invited us over to make sushi. This, of course, meant crab rangoons were on the menu too. And crab cakes. And peach margaritas. I dunno, it made sense at the time.


Anyway, turns out rangoons are really easy to make. Just mix up some cream cheese, chopped green onions, and shredded synthetic crab meat...


Scoop fat spoonfuls of filling into the center of some wonton skins...


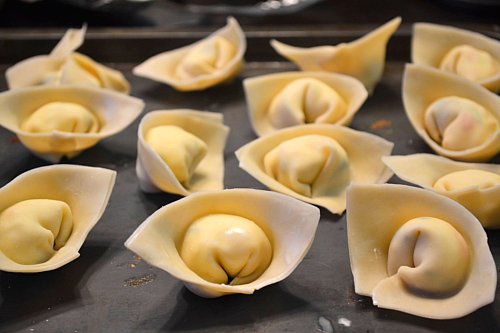
And fold those suckers into adorable little wonton shapes. Triangular rangoons are easier to make, but I love that these look like little ladies in bonnets.


We originally made these to be an appetizer to our pre-planned dumpling dinner, but they were so good we just ate them for dinner instead. Great decision. They were wonderfully crispy and savory, with hot, creamy/gooey centers. Yum.

Crab Rangoons

Ingredients:
- 8 oz cream cheese, room temperature
- 1 cup synthetic crab meat, chopped or shredded
- 1/2 cup green onion, chopped
- 1-1/2 packets of wonton skins
- 1/2 cup water for sealing

Steps:
(1) Fill your fryer with oil and heat to 350 degrees.
(2) In a large bowl, mix together cream cheese, crab meat, and green onions until well-combined.
(3) Spoon about a teaspoon of filling into the center of a wonton skin, wet the edges of the skin with water, and fold it in half so that you get a rectangle with a lump in the center. Then, take the bottom two edges of the rectangle, where the skin is folded, and pull them gently together. The edges of the skin should fold inward, and you'll get something that looks like a lady wearing a bonnet. (You can also just fold the wrapper corner to corner so that you have a triangle rangoon. Either way, make sure edges are tightly sealed.)
(4) Repeat however many times you need until all the filling is used up. (I made around 3 dozen rangoons.)
(5) Fry rangoons until they are dark gold in color -- about 4.5 minutes.
(6) Enjoy while hot...but be careful not to burn your tongue on molten cream cheese!

Sunday, July 10, 2011

Japanese-Style Strawberry Shortcake


Is it just me, or do desserts in Japanese anime/manga always look amazing? Whether it's cake, pie or ice cream, everything is always so sparkly and elaborate, surprisingly realistic-looking, and just positively oozing with goodness. My stomach pretty much growls constantly when I'm reading food/dessert-themed manga. I'm a nerd, I know.


Anyway. I'd always assumed that the cakes in my mangas were completely made up and too elaborate to replicate in real life. Imagine my excitement when I saw a picture of Japanese-style strawberry shortcake on TasteSpotting last month that looked exactly like one of the cakes that always appears in food-themed mangas. Spoiler alert: I was super excited.


And, since it's just a shortcake, this cake was actually really easy to make. As far as I can tell, the only real difference between this type of cake and regular American shortcake is that the cake itself is spongier, and the whipped cream is stabilized with gelatin to create a more frosting-like consistency. No real difference in taste -- just the same ol' delicious, berry/cream goodness. Doesn't it look pretty, though?

Japanese-Style Strawberry Shortcake (Adapted from the Flour on Her Nose recipe)

Ingredients:
(Sponge cake)
- 3 large eggs, separate + 1 whole egg
- 1/2 cup flour
- 1/4 cup sugar
- 1/4 cup vegetable oil
- 1/2 tsp vanilla
- Pinch of salt

(Whipped topping)
- 1-1/2 cups heavy whipping cream
- 2-1/2 tsp gelatin (1 packet)
- 1 tbsp cold water
- 1/2 cup sugar

Steps:
(1) Preheat oven to 300.
(2) In a large bowl, beat egg whites + sugar until stiff peaks are formed. Set aside
(3) In a separate bowl, beat egg yolks, whole egg, salt, flour, oil, and vanilla until well-combined. Batter will be very thick and yellow.
(4) Gently fold egg white mixture into the batter until the two are completely combined. The mixture should be smooth and uniform in color.
(5) Pour batter into a greased 8x8 square cake pan. Bake for 25 minutes, until the top is golden brown. While cake cools, get to work on the whipped topping.
(6) In a small bowl, combine gelatin and cold water. When gelatin powder is completely dissolved, microwave the bowl for about 15 seconds, until the mixture is liquid. Set aside to cool.
(7) In a medium bowl, beat cream and sugar until you see stiff peaks. With the mixer still going, add the liquid gelatin mix and keep whipping until the whipped cream will become noticeably stiffer and more frosting-like. (This happens quickly!)
(8) To assemble, level and split the cake into two equal layers. Spread a thin coat of whipped frosting on top of one of the cake layers.
(9) Make a ring around the edge of the cake with halved strawberries, cut-side out. Fill in the middle with whole strawberries, pointing up.
(10) Cover the strawberries completely with most of the remaining cream, so that there is about a centimeter of cream between the tops of the strawberries and the next layer of cake.
(11) Place the top layer of cake on top of the strawberries/cream. Spread with the remaining whipped cream topping.
(12) Chill in the fridge for 30 minutes, then slice into rectangles and serve.

For other great dessert ideas, click here.

Sunday, June 5, 2011

Hanbagu (Japanese Hamburger Steak)


So, my friend Spike and I have been having intense gchat conversations about what we can do with all the ground beef we've got on our hands.  We each saw family-sized packs of ground beef on sale at the grocery store a couple weeks ago and couldn't resist getting in on the deal. Seemed like a pretty idea at the time, but now we've each got 5 lbs of meat in the freezer. That is a lot of meat, guys.


I used up a little over a pound of the meat for stuffed burgers a few weeks ago, and Spike made both burgers and meatballs.  Not sure what he's going to do with the rest of his meat, but I have grand plans for kimchi fried rice, empanadas, and maybe sliders. Today, though, it's Japanese hamburger steaks topped with a runny egg for lunch. Delicious! 2.5lbs down, 2.5 more to go. Oy.

Hanbagu (Japanese Hamburger Steak)

Ingredients: (Makes 2 hamburg steaks)
- 1 lb ground beef
- 1/2 cup onions, diced and cooked until soft
- 1 tbsp garlic powder
- 1 tbsp salt + more for sprinkling
- 1 tsp crushed red pepper
- 1 cup panko bread crumbs
- 2 eggs.

Steps:
(1) In a large bowl, combine all ingredients. Stir until well mixed.
(2) Divide meat mixture into two equal parts. Shape into patties.
(3) In a large pan, fry patties in olive oil until a nice crust forms on the outside -- about 2-3 minutes on each side. Place on plates and set aside.
(4) Cook two eggs sunny side up, and top each cooked patty with an egg. Sprinkle a dash of salt/pepper on the egg for flavor.
(5) Serve with some nice vegetable sides -- spinach, potatoes, carrots, etc.

Saturday, May 21, 2011

Scallion Pancakes (Cong You Bing)


Any time Dan and I get Chinese delivery, we make sure to get an order of scallion pancakes and crab rangoons. They are equally delicious, but I always feel kind of bad eating (and loving) crab rangoons. I mean, they're fake Chinese food! As a good Chinese person I feel like I should turn my nose up at it and treat it with the same disdain that I have for orange chicken and General Gao's-anything. But they're just so creamy and fried and delicious, and I can't help myself from going back to them again and again. I'm not a strong person.

(BTW, we painted our walls. You like?)

Scallion pancakes are different, though. My mom used to make me scallion pancakes for lunch when I was a kid. And, they're offered on all the menus at even the most authentic Chinese restaurants. Surely that means they are legit?  And I can love them without shame? Umm, I'm going to go with "yes" and help myself to another pancake.

Scallion Pancakes

Ingredients:
- 2 cups flour
- 1-1/2 cups water
- 1 egg
- 1/4 cup vegetable oil (I used olive oil this time though. Seemed fine.)
- 1 tbsp seasame oil
- 1/2 cup scallions/green onions, chopped
- Salt to taste (I used a heaping spoonful)

Steps:
(1) In a large bowl, mix dry and wet ingredients + egg until a pancake-like batter has formed.
(2) Add scallions and stir until well-combined. Taste a little bit of the batter to make sure it's salty enough for your tastes. Set aside
(3) Heat a pan on medium/high heat. Spray with a light coat of cooking spray.
(4) When pan is hot, pour about 1/2 cup batter into the center of the pan. Using a spoon or spatula, spread batter out into a circular shape, about 1/4 inch thick.
(5) Cook for about a minute, then flip. Cooked side should be golden brown. Cook other side until the same.
(6) Repeat previous step until all batter is cooked. Slice pancakes into squares or wedges. Serve hot with soy sauce for dipping. (I like to add some crushed pepper, seasame oil, chopped garlic and green onions to the dipping sauce)

Wednesday, March 2, 2011

Chinese Dumplings (Jiao Zi)


Hey, remember when I said I was going to make jiaozi and baozi and tons of other Chinese goodies for the New Year? Well that didn't happen. I meant to do it, I really did! But  first I had to cook for my Superbowl party, then Valentine's Day snuck up on me, and I had to make tiramisu that one day -- before I knew it, it was March. Yikes! You know what they say about the best laid plans...


So, I promised Dan last night that I would finally make some dumplings for dinner. He was pretty pumped, because after eating all kinds of interesting things in China last summer (frogs, snake, congealed pig blood, etc.), he's really come to appreciate the straightforward deliciousness of the humble jiaozi. There was just one problem though: no pre-made, store-bought dumpling skins, and I was all out of wonton wrappers. Merde! That left me with two options: (1) disappoint Dan, who almost never craves anything and only gets excited about food when the stars align, or (2) make my own damn skins. Really, I only had the one option.


This was my first time making dumpling skins from scratch, but I wasn't too worried. I've watched my parents do it for years, and I've handled enough homemade skins in my lifetime to have a pretty good idea of what they're supposed to look and feel like. Plus, it's just flour and water, and really very straightforward once you get down to it. The only thing I had trouble with was rolling out the individual skins. They had a tendency to get really thin in the middle and stay thicker on the edges -- the exact opposite of what is desirable in a dumpling wrapper! It took a little practice, but after a couple skins I got the hang of it. Still, they were a little thicker than is ideal, because I was worried I'd make them too thin and they'd break apart while cooking.

As for the filling, I usually like to use ground pork, but for whatever reason my BJs, Safeway, and Shoppers almost never have it in stock. What's up with that?! Anyway, I wasn't happy about it, but I used the only thing I had on hand: ground chicken. Ground chicken and cabbage, actually. And you know what? It was great! If I hadn't made the dumplings myself, I would have never guessed the meat wasn't pork. Go figure.


Overall, not such a bad effort, if I must say so myself. Don't they look pretty legit? Not the prettiest dumplings in the world, but they basically look the way they're supposed to. And there's just something about seeing rows and rows of fat dumplings on a tray that really makes me happy. Probably because my parents only ever made homemade dumplings on special occasions, and I naturally associate dumplings with happy things. Not such a surprising association, since dumplings (when made correctly) are little packets of juicy, meaty deliciousness. I could probably eat a hundred of the things by myself!


Chinese Dumplings (Jiao Zi) With Chicken and Cabbage

Ingredients: (Makes about 20 dumplings)
(Wrappers)
- 2 cups all-purpose flour
- 2/3 cups water

(Filling)
- 1/2 lb ground chicken
- 1 cup Napa cabbage, shredded
- 1-1/2 tbsp soy sauce
- 1 tbsp seasame oil
- 1 tsp garlic powder
- Salt/pepper to taste
Steps:
(1) Starting with the filling,  mix all the ingredients in a bowl until well combined. Set aside.
**I like to leave off on the salt/pepper until after all the other stuff is incorporated, because you don't want your dumplings to be too salty. A quick lick is a good taste test, and I've never yet gotten salmonella from doing it.
(2) For the wrappers, mix flour and water in a large bowl until the dough comes together.  If dough is still too dry and floury, slowly add more water a little bit at a time until it is smooth and pliable. Dough should not be sticky.
(3) Shape finished dough into a ball, then cut it in half with a knife.
(4) Roll each half into a long strip, about 1 to 1-1/2 inches in diameter.
(5) Slice strips into 1/2-inch pieces.
(6) Flatten each piece into circles, then roll them out on a floured surface with a rolling pin. It doesn't matter if the skins aren't perfect circles, just make sure to get the dough as thin as you can. The middle should be a little thicker so the filling doesn't fall through, but the edges should be thin.
(7) Spoon a generous portion of meat filling into the center of each wrapper, then fold the wrapper in half. Pinch the edges closed, then scallop the edges of the dumpling by folding the outer edge in an overlapping pattern. (Like an accordion -- see picture above for guidance)
(8) Once wrapped, dumplings can be boiled in a savory broth, or pan-fried. To pan-fry like I did this time, heat olive oil in a large skillet until hot, then place about 5-7 dumplings in the skillet to cook.
(9) Pour about 1/2 a cup of water into the hot pan (it will sizzle!), then put a lid on the skillet. Shake the skillet to so that the dumplings don't stick to the bottom, then allow dumplings to cook until the water has evaporated.
**The bottoms of the dumplings should be light brown and fried-looking, and the rest should be entirely opaque with a yellowish/brown tinge. If parts of the wrapper are still white or translucent, the dumpling is not cooked all the way.
(10) Enjoy plain or with soy sauce and vinegar.

Sunday, February 6, 2011

Wonton Cups with Spinach and Mushroom Ricotta Filling


Happy Superbowl Sunday, everyone! And...happy 1 year anniversary to my blog! To celebrate both momentous occasions, I spent the better part of the afternoon cooking: crab quesidillas, pizza dip, fresh guacamole, and...wonton cups with spinach and mushroom filling.

Why wonton cups? Well, I got really into cooking-themed books last year, and these cups were mentioned in passing in one of my books. There, the cups were filled with tuna tartare, but I had a feeling the people coming to my Superbowl party weren't going to be thrilled with raw fish, so I went with something a little tamer.


Who knew wonton wrappers were so versatile? I'd only ever used them to make wontons and crab rangoons, but they're actually quite effective as Tostito-esque scoops. And aren't they pretty? This is definitely something that looks fancier and more complicated than it actually is.

You can fill the cups with just about anything -- hummus, crab dip, salsa -- but I can tell you that sauteed spinach/mushrooms with ricotta was very tasty. The only downside is that, once filled, the cups lose a lot of their crisp/crunch over time. Maybe more time in the oven would fix this? Or perhaps frying vs. baking? 

Wonton Cups

Ingredients:
- 1 package of wonton skins

Steps:
(1) Preheat oven to 350
(2) Grease a mini muffin pan.
(3) Press a single wonton skin into each muffin cup. Make sure the skin doesn't fold in too much -- there needs to be enough space to fill with good stuff.
(4) Bake for 7-9 minutes, until lightly brown and crispy.
(5) Fill with anything you want, or serve as dip scoops.

Saturday, February 5, 2011

Kimchi Bokumbop (Kimchi Fried Rice)


Happy Lunar New Year, everyone! All last week I had grand plans to make jiao zi (dumplings) and dou sha bao (steamed buns with red bean paste) and other Chinese goodies, but somehow I never got around to it. Fortunately, the New Year is supposed to be celebrated for 15 days, so I've still got plenty of time to make everything.

In the meantime, I just had to satisfy my craving for kimchi fried rice. My friend Grace posted a picture of her husband cooking it for a midnight snack a few days ago, and I've had kimchi on the brain ever since. It's just so pungent and tangy and delicious! So good as a side, but possibly even better in fried-rice form. It's definitely way better comfort food than mac and cheese or ice cream. And, I just happened to have a small jar of very ripe (best if used by 12/10/10...but still tasty in February!) kimchi sitting in my fridge, waiting to be eaten.


Since Dan and I live together now, it's pretty rare for me to cook a meal just for myself, especially on  weekends. Everything I cook these days is tailored to both of our tastes. So, it was with some trepidation that I asked Dan how he felt about having kimchi fried rice for lunch today. I love kimchi, but he hated it the last time we went to a Korean BBQ restaurant, and has steadfastly refused to eat it again since. Fortunately for me, however, he has terrible long-term memory when it comes to stuff that he eats, so by the time I asked about lunch, he had already forgotten that he'd ever eaten kimchi, and was willing to give the fried rice a shot. 

The result? I'm going to remember this moment forever as a shining victory in my Dan-feeding adventures. He not only ate the rice, but pronounced it delicious and went back for seconds. Awesome.

For the recipe and quick explanation of kimchi fried rice, check out www.trifood.com. 

Sunday, January 30, 2011

Sushi -- Unagi Rolls and California Rolls


Hello, all. I'd like to introduce everyone to my third guest blogger -- my good friend Christina Feng. We were near inseparable in our first two years of college, but the only time I ever saw her in the kitchen was the time we made fortune cookies for our friend Jimmy's birthday. Turns out she was hiding secret cooking powers from me! But now the cat is out of the bag, and she's here today to share a recipe with us. I'm ghost-writing the blog entry, but all pictures are courtesy of Christina. Thanks, Stina!


So Christina's boyfriend's parents are in town this weekend, and like the good girlfriend-in-law that she is, she decided to treat them to a delicious home-cooked meal. Miso soup to start, unagi and california rolls as the main course, and mochi ice cream for dessert. Yum!


I've never made sushi before, but Christina tells me it's easy so long as you have one of those bamboo mat thingies for rolling. I remain skeptical, but I suppose it's one of those practice-makes-perfect situations. Meanwhile, doesn't that eel look scrumptious? California rolls will always have a special place in my heart -- for the longest time it was the only kind of sushi I could convince Dan to eat -- but I love unagi the most. If you ever go to a sushi restaurant with me, be sure to call dibs on the eel as soon as it gets to the table, 'cuz I'm definitely going to eat it all.


Jason sure is a lucky guy! And after a meal like this, how can his parents not love Christina too? Will you make this for me sometime, Stina???

And now a word from Christina herself on the actual recipe:

OK soooo in terms of a recipe, I don't really have one particular one that I went with because I did this once before and I kinda just made it up as I went along and/or took bits and pieces from random recipes I found online.

Ingredients: 
- Frozen unagi kabayaki (from Asian store)
- Imitation crab sticks
- 1 avocado cut into thin strips
- 1 cucumber cut into thin strips
- Sushi rice (4-5 cups makes about 5 to 6 rolls)
- Sushi vinegar
- Sushi seasoning
- Roasted seaweed

(Need bamboo sushi roller)

Steps:
(1) Cook unagi per package instructions (the one I got I just heated in boiling water for 10 minutes), then cut it into strips. Set aside.
(2) Cover bamboo roller with saran wrap and place one sheet of roasted seaweed over it.
(3) Prepare sushi rice, mix with small bit of sushi vinegar in a bowl before placing on seaweed.
(4) Spread rice over roasted seaweed in a thin, even layer, and press it into the seaweed to maximize stickiness.
(5) Sprinkle sushi seasoning over rice. (Some people who like wasabi can then mix wasabi into the rice, but I didn't cuz I hate wasabi)
(6) Place strips of either imitation crab or unagi across seaweed, depending on which roll you're making.
(7) Place sticks of cucumber and/or avocado across seaweed.
(8) Use bamboo roller to tightly roll the sushi.
(9) Cut roll into 1/2" pieces (Since sushi is sticky, use a really sharp knife. Neat trick here is to use water to wet knife then cut if the knife gets too sticky)
(10) Serve! (with soy sauce of course...)

Wednesday, December 22, 2010

Salt and Pepper Chicken


Anyone who went to college in the Boston/Cambridge area has ordered from Quan's Kitchen at least once. Generous portions of greasy Chinese food, low prices, and delivery until 1am -- what more could a college kid want? Pulling an all-nighter to study for a test? Order some Quan's to keep your energy up. Hungry after a night of drinking with your friends? Greasy Chinese food cures hangovers. Tired of dining hall food? Q-U-A-N-S!


Quan's actually has pretty decent authentic Chinese food, but the majority of its young clientele are of the Kung Pao Chicken persuasion. Yuck. Dan used to be one of those people. Back when Dan was a Chinese food noob, he was a huge fan of the Orange Chicken at Panda Cafe. When he discovered Quan's, he loved the General Gao's Chicken. He eventually moved on to the Udon Noodles, and then finally settled into a long Salt and Pepper Chicken phase. In fact, after I graduated and moved away to start law school, Dan quickly fell into the habit of ordering SPC from Quan's multiple times per week, and sometimes twice a day. Delicious, yes. Healthy, no. Is he any fatter? No. Unfair!


Thankfully, since moving down here with me, Dan's eating habits have improved, largely because I am the Decider of Meals. But, even I still get the occasional Quan's craving, and after watching Dan gaze longingly at a fraternity brother's Salt and Pepper Chicken during our most recent visit up north, I decided to replicate the dish for him in our kitchen.

None of the recipes I found online seemed quite right, so I winged it. I chopped up a couple boneless chicken breasts into bite-sized pieces, dredged them in a flour/salt/pepper/garlic powder mixture, and pan-fried them in some olive oil. Result? Delicious! But not all were as crispy as they should be. I over-crowded the first batch in the pan, and the chicken took a long time to crisp up, and even then not by a whole lot. The second batch had room to breathe, and they not only cooked all the way through more quickly, but were also wonderfully crispy. Dan was a happy camper!

Salt and Pepper Chicken

Ingredients: (All measurements were eyeballed, so...good luck!)
- 4 thin boneless chicken breasts, chopped into bite-sized pieces.
- 1 cup flour
- Salt + pepper + garlic powder to taste (I used probably 3 tbsp salt, 1 tbsp pepper, and 1 tbsp garlic)
- 2/3 cup olive oil

Steps:
(1) In a medium bowl, mix flour, salt, pepper, and garlic powder until well combined.
(2) Add chopped, raw chicken to the mixture, and toss until each piece is completely coated.
(3) Heat olive oil in skillet on high heat.
(4) Cook chicken in two or three batches, making sure not to crowd the pan.
(5) Cook until chicken is golden and crispy.
(6) Serve with a big bowl of fluffy white rice.

Wednesday, November 17, 2010

Okonomiyaki


In the last two days or so, I've become obsessed with a food blog called "Closet Cooking." It was started by a guy who realized one day that he was eating the same things over and over again, and wanted to spice up his daily dining experiences. So he dove right into the world of cooking and went from making grilled cheese sandwiches to inventing caramelized pear and gorgonzola quiches. Meanwhile, I'm making 30-minute skillet chicken parmesan...


One of the recipes on the blog that caught my eye was the one for Okonomiyaki. My experience with Japanese cuisine has been limited mainly to teriyaki and sushi, but I'm an avid watcher of Anthony Bourdain's No Reservations, and I knew about okonomiyaki from his visit to Osaka. They're basically just savory pancakes filled with whatever you want. In my case, I wanted lots and lots of vegetables to counter all the crap food I've been eating lately. Grated carrots and cucumbers, chopped green onions and cabbage. No bacon! Although I bet bacon would be really delicious in this...


I was almost done cooking before I realized that I didn't have either okonomiyaki sauce or Japanese mayonnaise to spread on top of the pancakes. I wasn't sure if okonomiyaki without sauce qualified as okonomiyaki, but I figured that as long as I had some kind of mayo on there I was in the clear. So, I whipped up some zesty Ranch mayo and drizzled that over my pancakes instead. I thought the tangy, creamy mayo was delicious, but Dan didn't like it as much and chose to eat his okonomiyaki with sriracha sauce instead. I tasted a bite from his plate, and I can testify that the pancakes are delicious no matter which sauce you go with.. 

Recipe for Okonomiyaki can be found here.

Saturday, November 6, 2010

Chinese Birthday Meal


I have the best mother on the planet. I know everyone thinks their mother is the best, but take my word for it guys...mine is the greatest ever. She's beautiful, glamorous, wildly intelligent, kind-hearted, and generous to a fault. She's always there for me when I need her, I'm pretty sure her life goal -- other than becoming an international expert on honeybee viruses (which she is) -- is to make sure I'm happy and fulfilled, and she bullies me into being the best that I can be every day. She is my idol, and I love her. And I don't think I do enough to show her that I appreciate her.

Her birthday was last Thursday, and as per usual I had something delicious delivered to her office to be shared with her co-workers. But, because I was feeling particularly grateful to my mom (she and my dad gifted us the down payment on our new condo...see what I mean about generosity?), I wanted to do something extra special for her. So, I invited her over for a home-cooked, traditional Chinese birthday meal. What better way to show someone you care about them than to feed them?


We started with deviled eggs. OK, so deviled eggs aren't exactly a "traditional Chinese food." But, I read somewhere online that eggs are eaten on special occasions in China, because their round, smooth shape symbolizes continuity and unity. Or maybe it has something to do with fertility? Either way, eggs are special, so I was making eggs for my mom. Plain ol' hard-boiled eggs are gross though, so I jazzed them up a bit with mustard and mayo. Delicious!


Dumplings are also can important dish for special occasions, because they look like money (old school Chinese money), and so symbolize good fortune/wealth. My local grocery store didn't carry dumpling wrappers so I had to make do with wonton wrappers instead. I mixed together ground pork, green onions, chopped cabbage, soy sauce and sesame oil, folded them into roughly dumpling-esque shapes, tossed them into my wok, and hoped for the best. Not the prettiest dumplings I've ever made, but pretty tasty anyway.


No Chinese birthday is complete without "longevity noodles." Noodles are a symbol of longevity in China, and long noodles represent long life. On birthdays, we customarily eat bowls of noodles to ensure that we live long and healthy lives. I want my mom to live a very long and very healthy life, so I obviously had to serve her noodles.


As far as I know, pork doesn't symbolize anything...Chinese people just love to eat it. Who can blame us? It's fatty and delicious. My dad makes the best fatty pork dish I've ever tasted -- the fat just melts on your tongue, and the rest of the meat is unbelievably tender and flavorful. I couldn't even begin to compete with that, so I decided to make braised pork ribs instead. My friend from college recently posted a recipe for it on her blog, and I tried it out to great success and praise from everyone. Thanks, Lucy!


My proudest achievement in this meal was this birthday cake. Chinese-style birthday cakes are different from traditional birthday cakes in that they're a lot less sweet, utilize tons of fresh fruit, and have a much lighter/fluffier frosting. My mom has a crazy sweet tooth, but she hates the run-of-the-mill, sickly sweet birthday cakes found at grocery stores the world over. In recent years we've started ordering cakes from our local Asian supermarket, and they are always light and delicious. When I saw that my friend Lucy also had a post about Chinese bakery-style birthday cakes on her blog, I knew I had to try my hand at it. I am the world's worst cake froster, but the cake was wonderful. The spongy cake was light and fluffy, the frosting was delicate in its sweetness, and the fresh fruit was scrumptious. Dan and my dad both ate second helpings and declared it to be better than any other birthday cake they'd ever eaten. And my mom? She actually finished an entire slice of cake, and didn't scrape off 90% of the frosting like she usually does. Success!


Happy birthday, Mom! Hope you had a great day :)

Tuesday, June 1, 2010

Fried Rice


Maybe it's because it was the first thing I ever learned to cook, but fried rice is my ultimate comfort food. It's what my mom made for me instead of chicken noodle soup when I was sick, and it was my go-to dinner in college when the dining hall's food wasn't cutting it. Some people crave hot and melty Kraft mac n' cheese on a rainy day, I go for a big, steaming bowl of fried rice.


Fried rice so easy to make, and it's just chock full of all my favorite things to eat: eggs, rice, vegetables, and meat. It's good by itself as a meal, or as an accompaniment to other yummy side dishes. And, just 2 cups of rice can make enough food for an entire week's worth of lunch/dinner!


Because I like the taste of slightly burnt food, I always let my fried rice cook just a little longer than necessary so that the stuff on the bottom of the pan gets nice and crispy. This way, every bite is a delightful mix of different textures and flavors. Mmm.


Most recipes say that you're supposed to use slightly dry, day-old, cooked rice. I think that's a terrible idea. Comfort food is all about texture, and hard, dry food is not comforting. You wouldn't eat dry mac n' cheese or hard mashed potatoes, right? So I always use fresh rice -- this way, the resulting fried rice is super soft and moist, and it doesn't dry out as much after refridgeration. Win-win.


Fried Rice

Ingredients:
- 1-1/2 cups rice
- 2 cups water
- 1 bag frozen mixed vegetables, thawed.
- 3 large eggs
- Meat of choice (I like pork or chicken, usually)
- Salt

Steps:
(1) Combine rice and water in rice cooker. Cook until done. Set aside and let cool.
(2) Scramble eggs, letting them stay slightly runny. Take off heat.
(3) Drain vegetables. Saute in pan with eggs.
(4) If you're using raw meat, chop into small pieces and cook in a separate pan. Cook until outside is just slightly brown.
(5) Combine meat with eggs and vegetables. Mix until well combined.
(6) Add cooked rice. Combine well.
(7) Salt to taste.