Saturday, July 23, 2011

Zucchini Cakes


I think it's safe to say that the zucchinis have won. Dan and I are officially sick of the stuff -- we've eaten zucchini in some form or another every single day this week. Roasted, mainly, but also sauteed, mixed in with scrambled eggs, and cut into strips for fries. These zucchini cakes were a last ditch effort to keep the fruits of last weekend's labor from going to waste, but there's still one gigantic squash left. Thankfully, my parents were happy to take that off our hands before it started festering in a dark corner of my fridge.


Tired as I am of zucchini, these cakes were still pretty tasty. Kind of like crab cakes, only filled with zucchini instead of crab meat. I seasoned them with Adobo spices for a little zest, and that helped temper the intense zucchini flavor. If I weren't so zucchini'd out, I would actually really be a huge fan of these -- they're tender, flavorful, and relatively healthy. Definitely a great way to allow zucchini to be the star of the dish.

Zucchini Cakes (Adapted from The Life's Ambrosia's recipe)

Ingredients:
- 1 large zucchini, grated
- 1 large egg
- 1 cup panko bread crumbs
- Salt/pepper to taste
- 1 tbsp Adobo spices
- 1/2 cup Parmesan cheese, grated

Steps:
(1) Remove excess liquid from freshly grated zucchini by placing them between paper towels and squeezing.
** There will be a LOT of excess liquid, so I suggest you squeeze over the sink.
(2) In a large bowl, combine all the ingredients. Mix thoroughly.
(3) Heat a large pan on medium, and spray with Pam. Shape spoonfuls of the zucchini batter into 2-inch (diameter) patties, and drop onto the sizzling pan. Cook each side for about a minute and a half, or until the outside is golden brown.
(4) Finish the cakes off in the oven -- stick them on a baking pan and broil them for 1-2 minutes.
** Note: I skipped this step when I made my cakes, so the sides were still kind of soft -- not really a problem in terms of taste, but if you want a nice crust to form on the sides too, finishing them off in the oven should do the trick.
(5) Serve hot, alone or with ranch dressing.

** Hey! These cakes caught the attention of Glamour Magazine! **

Monday, July 18, 2011

Zucchini Bread


This past weekend a bunch of us piled into Dan's tiny Mazda and headed into the boonies of Virginia for some good old fashioned fruit picking. The original plan was to pick peaches and blackberries, but once we got to the farm, we realized they had a whole lot more to offer than just those two fruits. In the end, we came away with a huge bagful of peaches, six ears of corn, and four massive zucchinis. And it only cost us $11!


The peaches will definitely get eaten, and I already have plans to use the corn for upcoming dinners, but I must confess...I have never actually cooked a zucchini. In fact, I've only recently worked up the nerve to try eating zucchini, period. I just don't like squash, you know? But I ate zucchini bread a few weeks ago, and then had some roasted zucchini in a veggie lasagna a few days later. To my surprise, they were both delicious!


With four pounds of zucchini in my fridge, I'm definitely going to have to get inventive with my cooking. Last night we ate one two ways -- oven roasted, drizzled with olive oil and sprinkled with salt; and, breaded then baked into crispy fries. Yum! Zucchini may be my new favorite vegetable. Even so, that leaves...three more gigantic zucchinis in the fridge in the meantime. Yikes. 


So, I decided to try my hand at zucchini bread this morning. The recipe reminded me a lot of carrot cake, which I love -- cake-like batter flavored with vanilla, cinnamon, and nutmeg, and filled with several cups of soft, grated vegetables. Out of the oven, the bread was crusty on the outside and moist on the inside. Not too sweet, with an almost savory after taste from the combination of zucchini and olive oil. Delicious!

Zucchini Bread (Adapted from the Smitten Kitchen's recipe)

Ingredients:
- 2 cups zucchini, grated
- 3 large eggs
- 1 cup olive oil
- 1-1/4 cup sugar
- 2 tsp vanilla
- 1 tsp baking soda
- 1/2 tsp baking powder
- 3 tsp cinnamon
- 1/8 tsp nutmeg
- 1 tsp salt
- 3 cups flour

Steps:
(1) Preheat oven to 350.
(2) In a large bowl, whisk eggs until thick and yellow. Add olive oil, sugar, vanilla and zucchini until well-combined.
(3) In a separate bowl, combine dry ingredients. Slowly add to wet mixture, stirring after each addition until ingredients well combined.
(4) Pour batter into well-greased bread pan. (Smitten Kitchen divided the batter into 2 pans, but my batter fit into one pan.)
(5) Bake for about 50 minutes. Serve warm with tea, or smeared with cream cheese frosting.

Wednesday, July 13, 2011

Butterbeer Cupcakes


OK, raise your hand if you're excited about Harry Potter 7.2 coming out this week. I am super excited! Like millions of other people out there, I am a die hard HP fan. I basically grew up with the characters! I can still remember reading the first book in 6th grade and thinking "man...this is amazing...when's the next one coming out???" And every book after that just got better and better, as I became more invested in the character's lives -- I cheered when Harry finally stood up to the Dursleys, groaned when Harry went through all that teenage angst, cried when Dumbledore and Fred died, and whooped when Ron and Hermione finally kissed. It was 10-year long emotional roller coaster! 


But to be honest, I've never been a huge fan of the movies -- books are always better, in my opinion. Still, each of the movies has been better than the one before it, and the actors have really became pretty good at their craft. And, this is the last movie in the franchise!  Can't miss it.

Right now my plan is to see the midnight showing of HP tomorrow night with Amy, and then go see it again on Saturday with Dan and another friend. Is that, perhaps, too much Harry Potter, you ask? Nahhhhh.


To get me in the mood for the Wizarding World of HP, I decided to make some HP-themed food for the movie. A bunch of food blogs have been doing that lately, so I had plenty of inspiration. Cauldron cakes, candy wands, Golden Snitch cake pops -- it all sounded good, but the recipes all seemed pretty complicated. But then I found a recipe for butterbeer cupcakes...


These are perhaps the best cupcakes I've ever eaten in my entire life, bar none. It doesn't matter that there is no chocolate involved -- they're just so good! The cake itself  is incredibly moist and fluffy (probably from the addition of bubbly cream soda to the batter), and the butterscotch frosting is tongue tickling-ly delicious. HP fan or not, you must try this!

Recipe can be found here, courtesy of the amyBites blog.

** BTW, those adorable cupcake stands were hand made by my friend Emily!

Monday, July 11, 2011

Crab Rangoons


So last week I made crab rangoons for the first time. We were in Boston for 4th of July weekend, and one of our friends invited us over to make sushi. This, of course, meant crab rangoons were on the menu too. And crab cakes. And peach margaritas. I dunno, it made sense at the time.


Anyway, turns out rangoons are really easy to make. Just mix up some cream cheese, chopped green onions, and shredded synthetic crab meat...


Scoop fat spoonfuls of filling into the center of some wonton skins...


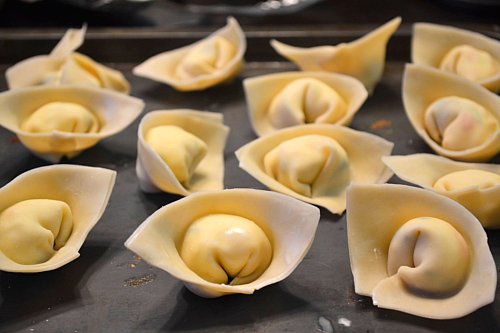
And fold those suckers into adorable little wonton shapes. Triangular rangoons are easier to make, but I love that these look like little ladies in bonnets.


We originally made these to be an appetizer to our pre-planned dumpling dinner, but they were so good we just ate them for dinner instead. Great decision. They were wonderfully crispy and savory, with hot, creamy/gooey centers. Yum.

Crab Rangoons

Ingredients:
- 8 oz cream cheese, room temperature
- 1 cup synthetic crab meat, chopped or shredded
- 1/2 cup green onion, chopped
- 1-1/2 packets of wonton skins
- 1/2 cup water for sealing

Steps:
(1) Fill your fryer with oil and heat to 350 degrees.
(2) In a large bowl, mix together cream cheese, crab meat, and green onions until well-combined.
(3) Spoon about a teaspoon of filling into the center of a wonton skin, wet the edges of the skin with water, and fold it in half so that you get a rectangle with a lump in the center. Then, take the bottom two edges of the rectangle, where the skin is folded, and pull them gently together. The edges of the skin should fold inward, and you'll get something that looks like a lady wearing a bonnet. (You can also just fold the wrapper corner to corner so that you have a triangle rangoon. Either way, make sure edges are tightly sealed.)
(4) Repeat however many times you need until all the filling is used up. (I made around 3 dozen rangoons.)
(5) Fry rangoons until they are dark gold in color -- about 4.5 minutes.
(6) Enjoy while hot...but be careful not to burn your tongue on molten cream cheese!

Sunday, July 10, 2011

Japanese-Style Strawberry Shortcake


Is it just me, or do desserts in Japanese anime/manga always look amazing? Whether it's cake, pie or ice cream, everything is always so sparkly and elaborate, surprisingly realistic-looking, and just positively oozing with goodness. My stomach pretty much growls constantly when I'm reading food/dessert-themed manga. I'm a nerd, I know.


Anyway. I'd always assumed that the cakes in my mangas were completely made up and too elaborate to replicate in real life. Imagine my excitement when I saw a picture of Japanese-style strawberry shortcake on TasteSpotting last month that looked exactly like one of the cakes that always appears in food-themed mangas. Spoiler alert: I was super excited.


And, since it's just a shortcake, this cake was actually really easy to make. As far as I can tell, the only real difference between this type of cake and regular American shortcake is that the cake itself is spongier, and the whipped cream is stabilized with gelatin to create a more frosting-like consistency. No real difference in taste -- just the same ol' delicious, berry/cream goodness. Doesn't it look pretty, though?

Japanese-Style Strawberry Shortcake (Adapted from the Flour on Her Nose recipe)

Ingredients:
(Sponge cake)
- 3 large eggs, separate + 1 whole egg
- 1/2 cup flour
- 1/4 cup sugar
- 1/4 cup vegetable oil
- 1/2 tsp vanilla
- Pinch of salt

(Whipped topping)
- 1-1/2 cups heavy whipping cream
- 2-1/2 tsp gelatin (1 packet)
- 1 tbsp cold water
- 1/2 cup sugar

Steps:
(1) Preheat oven to 300.
(2) In a large bowl, beat egg whites + sugar until stiff peaks are formed. Set aside
(3) In a separate bowl, beat egg yolks, whole egg, salt, flour, oil, and vanilla until well-combined. Batter will be very thick and yellow.
(4) Gently fold egg white mixture into the batter until the two are completely combined. The mixture should be smooth and uniform in color.
(5) Pour batter into a greased 8x8 square cake pan. Bake for 25 minutes, until the top is golden brown. While cake cools, get to work on the whipped topping.
(6) In a small bowl, combine gelatin and cold water. When gelatin powder is completely dissolved, microwave the bowl for about 15 seconds, until the mixture is liquid. Set aside to cool.
(7) In a medium bowl, beat cream and sugar until you see stiff peaks. With the mixer still going, add the liquid gelatin mix and keep whipping until the whipped cream will become noticeably stiffer and more frosting-like. (This happens quickly!)
(8) To assemble, level and split the cake into two equal layers. Spread a thin coat of whipped frosting on top of one of the cake layers.
(9) Make a ring around the edge of the cake with halved strawberries, cut-side out. Fill in the middle with whole strawberries, pointing up.
(10) Cover the strawberries completely with most of the remaining cream, so that there is about a centimeter of cream between the tops of the strawberries and the next layer of cake.
(11) Place the top layer of cake on top of the strawberries/cream. Spread with the remaining whipped cream topping.
(12) Chill in the fridge for 30 minutes, then slice into rectangles and serve.

For other great dessert ideas, click here.

Friday, July 8, 2011

Peanut Butter Cup Bars


A lot of people love chocolate and peanut butter, but my friend Emily really loves it. Like, "possibly bordering on an unhealthy addiction" kind of love. She actually refers to Reese's peanut butter cups as "crack," and goes out of her way to avoid the stuff because if there's any of it around the house, she'll keep eating and eating until she wants to puke.

OK, I know what you're thinking -- lots of people love chocolate, and pretty much everyone has at some point or another eaten so much candy that they want to die. Trust me when I say that this is different. I've seen this woman demolish a one pound, jumbo-sized Reese's peanut butter cup in 30 seconds and then reach for more. 


If peanut butter and chocolate = Emily's crack, I'm her dealer. The last time I had leftover peanut butter-chocolate cream cheese frosting, I gave her the carton and watched her eat it by the spoonful. Any time I see a new peanut butter/chocolate dessert online, I bookmark it to make for her later. And yes, I'm the one who bought her the aforementioned one pound, jumbo-sized peanut butter cups. You can call me a heartless enabler, or...you could say that I'm a super awesome person who likes to see her friend happy.

These peanut butter cup bars are my latest attempt to make Emily happy. I missed her birthday a few weeks ago, and I felt bad just giving her a Marimekko oven mitt. So, I whipped these babies up and gave them to her when she came over for dinner tonight. They were super easy to make, and they tasted exactly like store bought peanut butter cups. Delicious! I just hope she didn't eat all of them on the way home...

Recipe can be found here, courtesy of The Brown Eyed Baker blog.

Friday, July 1, 2011

Twisted Strawberry Lemonade


Last week, David Leibovitz's blog had a delicious-looking guest post on strawberry vodka. Soon after that, TasteSpotting and FoodGawker exploded with entries showcasing different fruit-infused vodkas. Since everyone else was doing it...


Yeah, I hopped on the infused vodka train. 


Ripe strawberries smell so good! And after three days in a tightly sealed jar with said berries, the vodka smelled pretty good too. One whiff and I had visions of delicious strawberry-flavored cocktails dancing before my eyes. 


Some people say summer is all about the beach and weekend cook-outs...I say it's about the drinks. Gotta stay hydrated in the heat, you know! And what's better for the body and soul on a hot summer day than lemonade? Strawberry Lemonade. With vodka.

Twisted Strawberry Lemonade

Ingredients:
- 2 cartons ripe strawberries, quartered
- 1 750-ml bottle of vodka
- 1 cup sugar
- 1 cup water + 4 more cups for diluting
- 1 cup lemon juice
- Ice

Steps:
(1) In a large jar or other seal-able container, combine strawberries and vodka. Soak for 3 days, swirling jar every day.
(2) Strain vodka into a large pitcher filled with ice. Set aside.
(3) In a pot, heat 1 cup water and sugar until sugar is completely dissolved. Turn off heat, and let syrup cool. Then, add syrup to the pitcher.
(4) Pour remaining 4 cups water and lemon juice into the pitcher. Stir until well combined.
(5) Serve with more ice. The colder the better!