Tuesday, April 27, 2010

Spinach & Mushroom Fettuccine Alfredo


Why is the weather in New England so crappy? I've been in Massachusetts for almost two days already, and I have yet to experience anything but ominous-looking clouds, wind, and rain. The only upside to this crappy weather is that it gives me an excuse to cook creamy, rich, hot comfort food that would be way too heavy on a warm day.


Dan and I weren't feeling up to dealing with raw meat today, and he hates grocery shopping with me (I get too excited by all the food possibilities, apparently), so we stuck to the produce aisle for dinner. Spinach and mushrooms are a timeless combo, and great in cream-based sauces.


"Don't crowd the mushrooms!" OK, Julia. I didn't crowd the mushrooms -- at least, not as much as I usually do. And you know what? They cooked faster!


I forgot how much spinach wilts. I started out with a big ol' pile of leaves, and in seconds they had cooked down to a mere mouthful. Luckily spinach is both healthy and delicious, so I didn't think twice about tossing in a few extra handfuls.


Alfredo sauce stresses me out. I'm not a patient person, and it always feels like takes so long for the cream to thicken up, no matter how much I whisk. But shredded Parmesan cheese and a few teaspoons of flour do wonders, and by the time the everything is bubbling, the sauce is just perfect.


The afredo was hot and creamy and satisfying -- perfect for a cold spring day in Massachusetts.


Spinach & Mushroom Alfredo (Adapted from Cooks.com recipe)

Ingredients:
- 3 cups spinach
- 2 cups mushrooms
- 2 cloves garlic, chopped
- 3 tbsp butter
- 2 cups cream
- 1-1/2 grated Parmesan cheese
- 3 tsp flour
- Pinch of salt
- 1/2 box fettuccine noodles

Steps:
(1) Bring 4 quarts water to a boil. Cook fettuccine until soft, stirring constantly to make sure the noodles don't stick. Add pinch of salt. Drain and set aside.
(2) Melt butter in a skillet. Saute garlic in the skillet on medium heat for about a minute.
(3) Add mushrooms to skillet, making sure to spread them out evenly. Cook until soft and brown.
(4) Add spinach, cook until wilted.
(5) Pour cream into skillet, whisking constantly until it begins to thicken.
(6) Add Parmesan and flour. Keep whisking for about three minutes. Add salt to taste.
(7) Take off heat. Add noodles, combining until each noodle is well-coated with sauce.
(8) Serve while hot.

Sunday, April 25, 2010

Chocolate Coffee Ice Cream Cake


Now that I'm free and in the clear school-wise, my friends have been sending me links to recipes they know I have plenty of time to try out. This unique ice cream cake was at the top of the "Tina, please make this for us!" list. 


The recipe called for cake mix. Usually, I try to stay away from boxed mixes. I just feel so much more accomplished when I make things from scratch, you know? But no one can a culinary superstar all the time, and there's just no denying that sometimes boxed mixes just taste better.


So, what's so special about this cake? It's made with ice cream! But not like a Baskin Robbins ice cream cake, where there's a layer of ice cream sandwiched between layers of cake. Here, the ice cream is literally mixed into the batter. For this cake, I chose coffee flavored ice cream.


The ice cream in this recipe acts like a substitute for milk in a regular chocolate cake, but the resulting batter is a lot creamier in consistency.


The batter looks a lot like melted ice cream going into the oven, but it turns out to be a pretty nice cake. Just be sure to thoroughly grease and flour (I dusted with cocoa powder) your bundt cake pan, or you'll end up with only half the cake on your plate like I did. Ugh.


I am absolutely going to add ice cream to every cake I bake from now on. I couldn't really taste coffee at all, but the cake was unbelievably moist and soft -- probably the best cake I've ever made. Chocolate ganache was a great touch, but the cake is so good by itself I may not use any kind of icing next time.

Recipe and backstory can be found here.

Friday, April 23, 2010

Pad Thai


When my friend Jill graduated (early!) law school back in December, she treated herself to a trip to Thailand. In between relaxing and sightseeing, she squeezed in a few cooking lessons, and brought back tons of awesome new recipes to share. At our most recent girls' night dinner, she showed me, Emily, and Leslie how to make pad thai.


I was pretty excited for this dinner, not least because this was my first time hanging out with Jill in about 4 months. What really sweetened the pot, though, was the fact that Jill is currently house/dog-sitting for a girl that works at Williams-Sonoma and has access to a kitchen stocked with all kinds of sweet cooking equipment. Just looking at the huge selection of mixing bowls this girl had made me feel consumed with envy!


I was too busy gushing over the fact the girl owned a mortar and pestle to be useful, so Emily decided to move things along by taking charge of the cashew crushing. Sure, we could have used a food processor or even a knife/cutting-board, but...there was a mortar and pestle!


I knew I would like this recipe when I saw the dried baby shrimp. Asian people love this stuff, but American's tend to shy away from food with eyes, so these little suckers have had a limited presence in my life since I moved out of my parents' house. What a shame!


After all the ingredients had been chopped and prepped, the first course of action was to make the pad thai sauce. Here is an action shot of Jill crushing palm sugar against the side of the wok with a spatula. Once the liquid started to boil, crushing became a lot easier, and the combination of sugar, orange juice, tomato paste, lime juice, and soy sauce started to smell pretty awesome.


After the sauce was ready and set aside, the rest of the recipe just flew by. Scramble some eggs with tons of garlic, add peeled prawns, toss in rice noodles, tofu, green onions, bean sprouts, etc. Mix together with sauce, top with cashews, then serve!


At this point the kitchen was full of all sorts of interesting smells, and the resident beggars came around to investigate. Meet Argos and Nezza. These beauties are both rescue dogs, and are pretty much the friendliest, smoochiest, most well-behaved puppies I've ever seen. Jill helped her friend adopt both of them through Lucky Dog Animal Rescue about a year ago, and she tells me that there are a lot of awesome puppies still looking for homes. Please check out the website and see if you can help today!


The pad thai was savory, tangy, hearty and satisfying. Great for a girls' dinner with some wine on a cold and gloomy spring day.


Pad Thai (Recipe is for 1 serving, increase ingredients as needed for larger portions.)

Ingredients
(Pad Thai Sauce)
- 3-1/2 tbsp tamarind juice (We used orange juice instead)
- 2-1/2 tbsp soy sauce
- 3 tbsp palm sugar
- 1 tbsp lime juice
- 1/2 tsp salt
- 1/2 tbsp tomato paste
- 1 tbsp white sugar

(Pad Thai)
- 3 tbsp vegetable oil
- 1 clove chopped garlic
- 1 egg
- 5 peeled prawns 
- 100 grams rice noodles (pre-soaked for 30 minutes)
- 1/4 cup prawn stock or water
- 1/2 tbsp dried shrimp
- 1/2 tbsp dried sweet turnips, chopped
- 2 tbsp deep fried tofu
- 1 tbsp cashew nuts, chopped
- 40 grams bean sprouts
- 20 grams chives or green onions, chopped

Steps:
(1) Start with the sauce. Combine the tamarind juice, mushroom soy sauce, palm sugar, white sugar, salt, and tomato juice. Bring to a slow bowl and stir constantly to ensure the ingredients are smooth and well-combined. Add lime juice and stir. Set sauce aside for later.
(2) Heat the wok with vegetable oil.
(3) Add garlic and stir-fry until fragrant.
(4) Add egg and scramble until well-mixed with garlic.
(5) Add prawns, and cook until pink.
(6) Stir in rice noodles and prawn stock. Stir until noodles are soft.
(7) Mix dried shrimp, sweet turnips, tofu and cashews.
(8) Pour in pad thai sauce. Mix well.
(9) Add bean sprouts and green onions.
(10) Garnish with a lime wedge and serve!

Wednesday, April 21, 2010

Simple Artisanal Bread


Today is an exciting day. Why, you ask? Well, for one thing, as of 12:30 p.m. today, I am officially done with final exams (and law school) forever. But more importantly, today is the day that I get to introduce my first ever guest blogger, Brittani. 

Brittani and I met in the Vaccine Injury Clinic this year, and as we became friends, I was pleased to discover that she likes cooking as much as I do. She kindly offered to send along some of her recipes for my blog, and her first contribution is Simple Artisanal Bread. Without further ado, here is Brittani's post:

***************************************************************
Hi Everyone!

My name is Brittani, and I’m a 3L/soon-to-be alumna with Tina at GW.  Unlike Tina, however I finished with finals and everything last Tuesday, so I jumped at the chance to guest blog here while she studies away.  A few things you should know about me: (1) I love to bake, something most of my friends know, and (2) I name my kitchen tools, something most people don’t know until now.

This is my fool-proof simple artisanal bread recipe:


Please don’t mock me for buying yeast in bulk, I hate those little packets and am constantly running out of yeast.
(Editor note: I didn't even know they sold yeast in jars! What a great idea...)

Yeast that is now happy and multiplied.  
Your browser may not support display of this image.

My favorite thing about this recipe: just dump the liquids into the flour and fold it in until an ugly ball of mess forms. See the ugly ball of mess? That means stop stirring, cover with plastic wrap and walk away. If you're me and trying to speed up the process, preheat the oven to 200 while you're mixing all the ingredients, then turn it off and place your plastic covered dough into the nicely warmed oven. Then you can walk away for just 3 hours instead of 6. I don't recommend this method, but I was out of beer so I couldn't make the dough until after 12 and I wanted to be finished before midnight.


Remember when I said I like to name my kitchen tools? Well this is Moose. Why Moose? Because he's big (5 quarts) and he's the workhorse of my kitchen (frying, roasting, soups and baking).Your browser may not support display of this image. Note the shiny metal knob on his lid.  It’s really important for this recipe.  The black knob that Moose came with would melt in the oven if used in this recipe. The shiny metal knobs run about $10 at most kitchen stores and online, and are beyond worth the expense. Also now is a good time to take the batteries out of your smoke detectors, trust me on this one. 


When you finally take everything out of the oven, you have this amazing homemade bread that really doesn't take a whole lot of work, just a little bit of planning ahead of time -- it's especially easy if you make the dough in the morning and let it rise all day.

Thank you to Tina for allowing me to do this! (Editor's note: I should be thanking you!) Eventually I'll start my own blog, but for now I don't have the patience, lighting, or the camera for taking so many pictures while baking. Now, if you'll excuse me, I need to go eat all of this right now.


Simple Artisanal Bread (Adapted from America’s Test Kitchen, Almost No-Knead Bread)


Ingredients:
½ tsp. Instant Yeast
1 tsp. Sugar
7 oz. Warm Water
15 oz. + extra All-Purpose Flour
2 tsp. Salt
3 oz. Beer (pale ales work best)
1 Tbsp. White Vinegar
  1. Place the warm water in a small bowl, add the yeast and sugar, don’t stir.  Let it sit until the yeast begins to boom (approximately 5 minutes).
  2. Whisk together the flour and salt in a large bowl.
  3. Place the beer in a small bowl with the white vinegar.
  4. Once the yeast is bloomed, dump the yeast mixture, vinegar and beer into the flour, and fold in until a ugly ball forms. 
  5. Cover with plastic wrap, place in a warm place and walk away for at least 6 hours until the dough has doubled in size.   You can leave it be for as long as 12 hours.
  6. Generously, sprinkle flour over your workspace.  Dump your dough onto the workspace and knead about 10-15 times, and no more than that.
  7. Form into a ball by pulling the corners under and forming a taunt skin on top
  8. Get a sheet of parchment paper approximately 15 inches long and coat with non-stick spray and place the dough onto the parchment paper, and cover with plastic wrap again. You can keep it in a skillet pan and place it somewhere of the way for the next 2 hours.
  9. Approximately 30 minutes before the dough is done rising, preheat the oven to 500 degrees and put your dutch oven in the oven
  10. After the 2 hours is up, cut a slit across the top of the dough to allow steam to escape and sprinkle with flour. 
  11. Carefully remove the dutch oven from the oven and reduce the heat to 425 degrees.
  12. Using the parchment paper, lower the dough into the dutch oven
  13. Bake with the lid on for 30 minutes, then remove the lid and bake for additional 10-15 minutes.  If you have an instant read thermometer, it should read 210 degrees when the bread is done.
  14. Cool on a baking rack until completely cooled if you can wait that long.

Wednesday, April 14, 2010

Caramel Cookie Sandwiches with Chocolate Ganache Filling


Have you ever noticed that it's times when you need to be the most focused and productive that you have the least motivation to get anything done? Finals are less than a week away, and I have yet to finish outlining for either of my tests. Am I locked away in some dark corner of the law school, frantically memorizing the finer points of wills and trusts? Nope! I am at home. Baking cookies.


A couple weeks ago all the Tuesdays With Dorie folks were making Dulce de Leche Duos. They looked amazing, and I've been wanting to make them ever since. But, does my Safeway carry Dulce de Leche? No, of course not. They do, however, have Smucker's Caramel Sundae Syrup! So I figured I'd throw that into the cookies, and make a chocolate ganache filling for sandwiching. Ah, improvisation. Emily often tells me I should have just called this blog "The Missing Ingredient" instead.


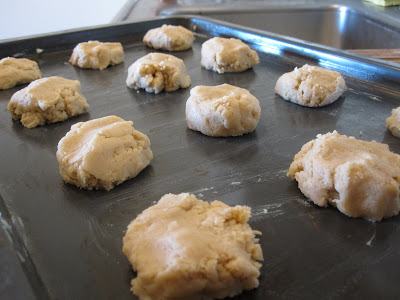
Instead of following the TWD recipe for the cookies, I decided to modify a chocolate chip cookie recipe instead. Don't ask me why. Probably because I felt like chocolate chip cookie type dough would go better with ganache. Anyway, this dough turned out to have a similar consistency to the Thumbprint Cookies I made a while back -- non-sticky and very malleable. I had a feeling they weren't going to flatten out as much as I wanted them to.


And I was right! The cookies were soft and chewy, but were a bit puffier than I wanted -- the TWD duos were so flat and pretty! But I'm just being nit-picky. A sandwich cookie is a sandwich cookie, no matter how flat or puffy it is.


And these were delicious. I probably could have added a smidge more caramel sauce to the batter, but overall the cookies were wonderfully chewy and caramel-y, and the chocolate ganache made them even more addictive. These definitely will not go uneaten for very long.

Caramel Cookie (Adapted from a Cooks.com Chocolate Chip Cookie Recipe)

Ingredients:
- 1 stick of butter, softened
- 1 cup brown sugar
- 3 tbsp white sugar
- 1 large egg
- 2 tsp vanilla
- 1/2 tsp baking powder
- 1/2 tsp baking soda
- 1 tsp salt
- 1/2 cup caramel sauce
- 1-1/2 cups flour

Steps:
(1) Preheat oven to 375.
(2) Cream together butter and sugars.
(3) Add vanilla, egg, and caramel sauce.
(4) Gradually add in dry ingredients. Mix until well combined.
(5) Add by spoonfuls to greased cookie sheet/pan.
(6) Bake for 8-10 minutes for softer cookies, 10-12 minutes for crispier cookies.
(7) While cookies are cooling, start making the ganache (below).


Chocolate Ganache:

Ingredients:

- 4 oz baking chocolate
- 1/2 cup heavy cream

Steps:

(1) In a saucepan or double boiler, stir chocolate and cream until melted.
(2) Allow ganache to cool slightly before spooning it between the cookies.

Saturday, April 10, 2010

Blueberry Cheesecake Bars


Man, it's been a long and stressful week. In the last 3 days I have done the following: attended the last few classes of my law school career, wrapped up all my cases for clinic, stayed awake for 38 hours straight to do work, and written an 8000 word paper in one day. I am tired. My body really isn't as resilient as it used to be.


But this week hasn't been all bad. I got a job, for one thing. Far more universally exciting though -- my friend Emily finally opened her Etsy shop! The picture above is an example of one of the adorable, hand-sewn Iphone/Ipod cases currently on sale on her website. As her artistic director and designer, I can tell you that everything is awesome, and she'll be coming out with more options in the very near future (pencil pouches, wallets, etc.). Check out the rest of her wares at Emerlina Designs.


OK, back to the blueberry cheesecake bars. I really need to get a bigger food processor. Or a pastry cutter. Any time I need to make some type of crust, I end up having to crumb everything by hand with a fork because my mini-food processor is so small that it would take forever to do the job. My hands get so tired...


In Julie & Julia, after a bad day at work, Julie makes a chocolate pie and says to her husband: "I love that after a day when nothing is sure, and when I say nothing, I mean nothing, you can come home and absolutely know that if you add egg yolks to chocolate, and sugar and milk, it will get thick. It's such a comfort." I know what you mean, Julie! It's such a comfort to know that any time I beat together cream cheese, sugar, and vanilla, I'll get something fantastically delicious in no time at all. 


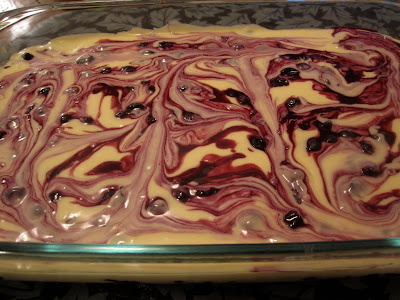
This recipe is super simple: it's just a layer of shortbread that's slathered with blueberry preserves and topped with cheesecake batter. I didn't think that would look very pretty though (we eat with our eyes, too!), and there were some frozen blueberries taking up space in the freezer, so I syrup-ified them and tossed them into the cheesecake too.


Pretty, right? Alright, so I went a little overboard with the swirling. I never know when to stop -- I usually just keep right on dragging the fork through the batter until the colors look less marbled and more muddy. But I managed to exert a little self-restraint this time and stopped before the whole thing turned into a murky, pale-purple mess.


Mmm. This turned out really well. The shortbread was buttery and delicious, the cheesecake part wasn't too sweet, and blueberries are tasty in any incarnation. I know calories don't count during finals, but I really need to get this out of my apartment before I inhale it all in one sitting...


Blueberry Cheesecake Bars (Recipe from Epicurious)

Ingredients:
(Shortbread crust)
- 1-1/2 sticks butter, cold and cut up into small pieces.
- 2 cups flour
- 1/2 cup brown sugar
- 1/2 tsp salt

(Cheesecake batter)
- 16 oz cream cheese
- 2 large eggs
- 3/4 cup sugar
- 1 tsp vanilla
- 3/4 cup blueberry preserves

Steps:
(1) Preheat oven to 350.
(2) Combine butter, flour, brown sugar and salt, pulse in food processor (or with a fork in bowl) until crumbly. Press into the bottom of a 13x9x2 pan. Bake for 20 minutes, until golden.
(3) While the shortbread is baking, beat the cream cheese until smooth, then add eggs, sugar, and vanilla. Set aside.
(4) Pull the shortbread out of the oven. Slather with a thin layer of preserves while still hot.
(5) Pour cheesecake batter over the shortbread and preserves in the pan.
(6) Bake for 30 minutes, until the top of the cheesecake has become slightly puffy.
(7) Stick everything in the fridge for about an hour to cool off and firm up. Eat!

Friday, April 2, 2010

Hot Cross Buns


"Hot cross buns, 
Hot cross buns,
One ha'penny,
Two ha'penny,
Hot cross buns."

Today is Good Friday. You know what that means? Hot cross buns! According to Wikipedia, in historically Christian societies, hot cross buns are traditionally eaten on Good Friday, with the cross in the middle standing as a symbol of the crucifixion of Christ. Pretty cool, huh?


I haven't worked with yeast since I made monkey bread during the Snowpocalypse.  That time I had to dissolve the yeast in warm water, but this time the recipe called for lukewarm milk. I didn't have any milk in fridge, but there was some buttermilk leftover from when I made Whoopie Pies, so I used that instead. Buttermilk isn't all that different from milk, right?


Buttermilk apparently isn't quite as much like milk as I thought. The dough just didn't come together as well -- it was much drier than it should have been, and I had to use even more buttermilk and melted butter (and a little water) to moisten it enough to hold together.


I don't know if it's because of the buttermilk, or if I just over-kneaded the dough, but the damn thing didn't rise nearly as much as it should. It was supposed to swell to twice the original size (which is exactly what happened when I made monkey bread), but it really only got about half as big as it should have.


Basting hot cross buns felt a lot like basting a turkey -- you brush the balls with sauce, let them marinate for a while, makes some slits, then juice 'em up some more. The glaze also called for milk, but as none had magically appeared in my fridge in the last hour or so, I substituted it with heavy whipping cream instead. 


These buns were crustier than I expected, and not as sweet. They were almost scone-like in consistency. Not sure if that's how they're supposed to be, but I think they still turned out pretty well considering all the experimenting I did with the recipe. They smell wonderfully cinnamon-y, and the icing adds just the right amount of sweetness to the buns.


The recipe can be found here at the Joy of Baking's website.